Staying competitive in the market requires consistently adapting to changes and fitting into the environment. At AeonX, we are always striving to ensure that our clients are progressing along with the industry’s evolving technology.
This is clearly illustrated by a recent engagement we had with one of our clients, which was highly successful. The client, one of India’s top healthcare organisations, is dedicated to offering high-quality treatment to everyone.
Towards achieving the ambitious goal, the client upgraded its SAP systems to drive efficiency and enhance operational capacity. The SAP system could not, however, be used to its full potential due to a lack of skilled personnel and structural inefficiencies.
AeonX promptly identified this problem and provided the necessary assistance to resolve it through our SAP Managed Services. Through SAP AMS, the client was able to maximize the efficiency of SAP systems. Additionally, this experience helped us to position ourselves as a leading SAP Managed Service provider.
By incorporating technology into what they do, we specialize in helping our clients’ businesses grow. It is plainly stated in our most recent engagement for a major infrastructure player.
Our client is a major infrastructure developer with a strong presence in the Build-Operate-Transfer (BOT) market. The client implemented cutting-edge technological progress and picked SAP solutions to boost efficiency in project completion.
However, they were unable to drive more value from their SAP solution due to incomplete technological knowledge. This limitation was found while carefully examining their IT architecture. The client was able to achieve strategic and focused value from their SAP solutions with assistance from our SAP managed services experts.
With the laying of the foundation stone, Gopal Namkeen was established in 1994. The company sells snacks and Namkeen both domestically and internationally and is one of the oldest and most well-known Indian brands. The headquarters of Gopal Namkeen is located in Rajkot, Gujarat, India.
Gopal Namkeen has a large dealer network, and on a busy day, this means processing a large number of orders and integrating backend ERP systems. To collect orders from their dealers, Gopal Namkeen relied on a legacy system. As most dealers buy wholesale products, these transactions involve bulk purchases as well. Traditional hosting was used for the underlying dealer portal application architecture, which was not well suited for speed. As the number of transactions increased, it became sluggish, and the user interface was difficult to manage.
Our team worked remotely on this project due to the pandemic, and it only took us two months to complete. They also needed the data to be in JSON format, which they could feed into the dealer portal.
Here’s how AeonX went about delivering a high-quality end solution:
Detailed Requirement Gathering from Gopal Snacks
Finalize solution design and database for Dealer Portal.
Dealer Portal development as per the scope.
Hosting of Solution in Development Environment
Testing by AeonX and Gopal Namkeen team for end-to-end portal
functionalities.
Solution Improvement as per the findings during testing.
DNS update for Domain Authentication using DKIM and CName records.
Go Live + 1 Month Go-Live Support
After gaining a thorough grasp of their needs, AeonX devised the following architecture to ensure that they don’t run into problems again:
The following are the advantages of the new dealer portal we created for Gopal Namkeen:
Dealers can order products based on their needs – the dealer portal allows them to be more flexible when it comes to ordering things. They can now put an order size that corresponds to their requirement.
Some of their items are produced in various locales. When a dealer places an order in this situation, the order is sent directly to the factory where the product is made.
If a dealer orders many products, not all of them are manufactured in the same place. In this situation, the order is sent to the appropriate factory, which subsequently delivers it to the dealer.
It’s possible that certain products will spoil while in transit. In that instance, the dealers are prohibited from purchasing the merchandise since the food may spoil before it reaches them.
Potato chips, for example, are created in all factories. When a dealer places an order for certain products, it is sent straight to the facility closest to them.
Gopal Snacks can limit order values based on a Dealer’s credit limit in the system — certain dealers were bringing in more sales for Gopal Namkeen than others. As a result, we created a gateway where they can allocate a higher-order value to their top dealers. This guarantees that companies are maximizing earnings and properly allocating their products.
Dealers may now access their credit limit on the dealer portal — Dealers can now easily view their credit limit on the order screen. This saves both parties a lot of time because they don’t have to engage on a frequent basis to verify how much credit they have.
With the help of live integration, once the vendor has paid, the system will automatically release the credit block – We designed a solution to automate their process once the money from the vendor is received.
Dealers can check on the status of their orders.
Through the portal, the dealer can obtain an account statement.
We assisted them in taking a stride forward and digitally transforming by having one of Gujarat’s largest automated plans. Their most important day-to-day operations have been automated. With the support of AWS, they can keep track of real-time SAP data. They may now study a wide range of data and make decisions based on analytics to maximize their earnings because they have access to a large amount of data.
There are many standard workflow scenarios available but some business requirements can not be satisfied by standard workflows. So it is important to develop something from scratch as per the business requirements. This blog post is mainly focused on the Sales Order Approval Process. In most of the case, there is only one Manager/Approver who is going to approve the SO. This can be managed by the SD Functional by some configuration and with the same configuration, you can also manage multi-level Manager/Approver too. But what if the business requirement is as bellow,
While creating or changing SO, a workflow should be triggered to a Manager/Approver.
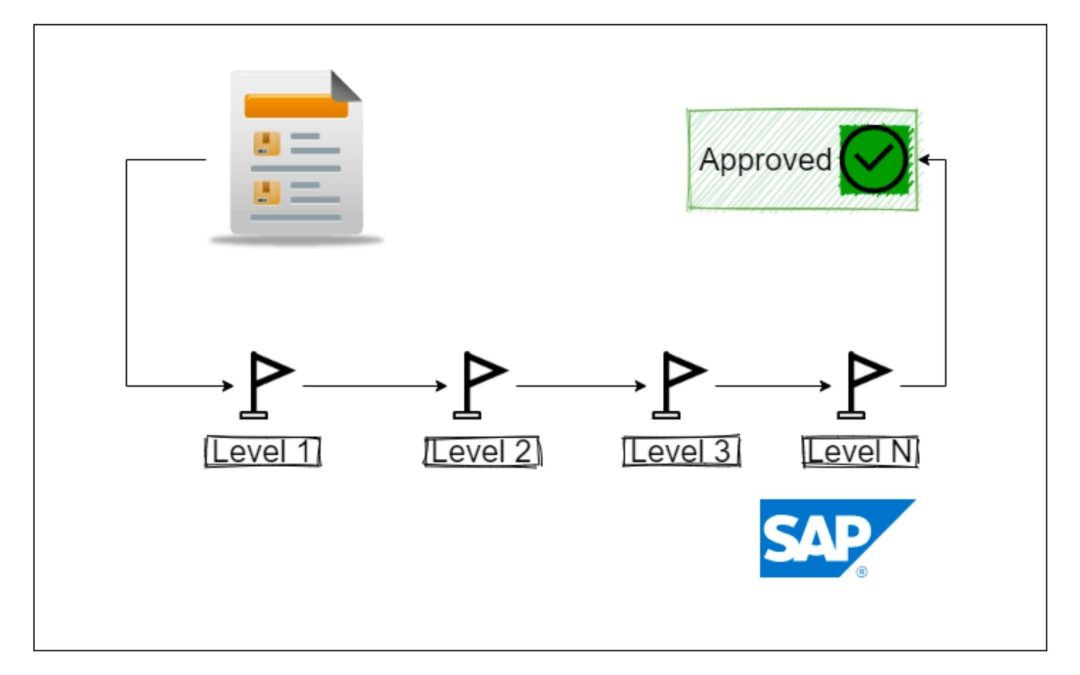
There are 4 Level of Manager/Approver who is going to approve SO one by one.
Sales Order is considered to be approved if the Final Approver level has approved it.
Final Approver can be Level 1 , Level 2 , Level 3 or Level 4 based on the SO amount fit to the range provided to each level.
i.e. Level 1 ( 0 to 1,000 )
i.e. Level 2 ( 1,000 to 10,000 )
i.e. Level 3 ( 10,000 to 1,00,000 )
i.e. Level 4 ( 1,00,000 and above )
Now if SO amount is 65,000, Level 3 is the Final Approver.
If Sales Order is in Credit Block, workflow should be triggered to a Manager/Approver to release it from Credit Block.
Before starting step by step implementation, let us see the basic prerequisites.
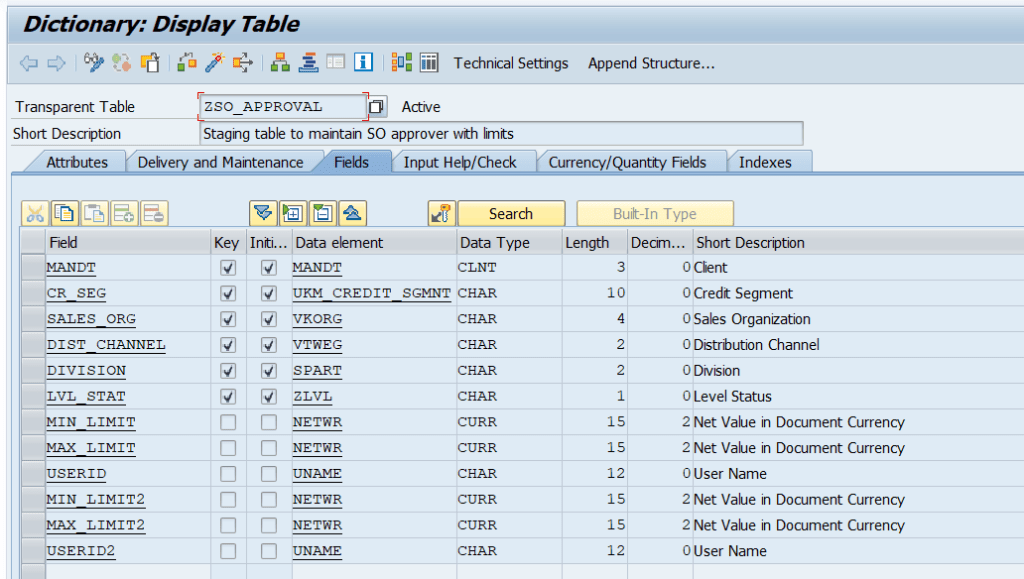
Custom Table: In SE11 -> ZSO_APPROVAL( Screenshot – 1 )
Table Maintenance : ZSO_APPROVAL. I have changed the screen, Utility->Table Maintenance Generator->Environment->Modification->Maintenance Screen.
( Screenshot – 2 )
Here, it is not necessary to maintain 4 entries. If there is only one entry like MinValue = 1.00 and Max_Value BLANK(Means anything) then Level 1 will be the Final Approver. In case there is no entry found in this custom table for a particular sales order so the sales order will be skipped from this Level-Approval Process and treated as per SAP Standard flow.
There is no Level-Approver to manage Credit Block. Only one approver is going to release sales orders from Credit Block based on the sales order amount.
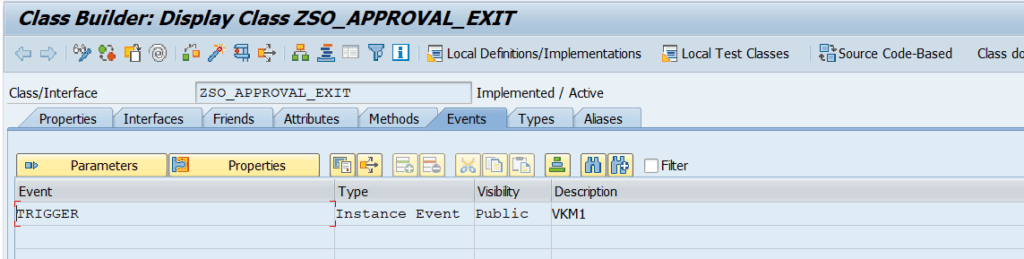
Class: Create a Class in SE24, ZSO_APPROVAL_EXIT with event ‘TRIGGER‘. This class also has some interfaces, methods, and attributes that will be covered after this workflow creation steps.
( Screenshot – 3 )
Function Module: Create a Function Module in SE37 as below. There is no importing or exporting or changing parameters.
( Screenshot – 4 )
Implementation Steps:
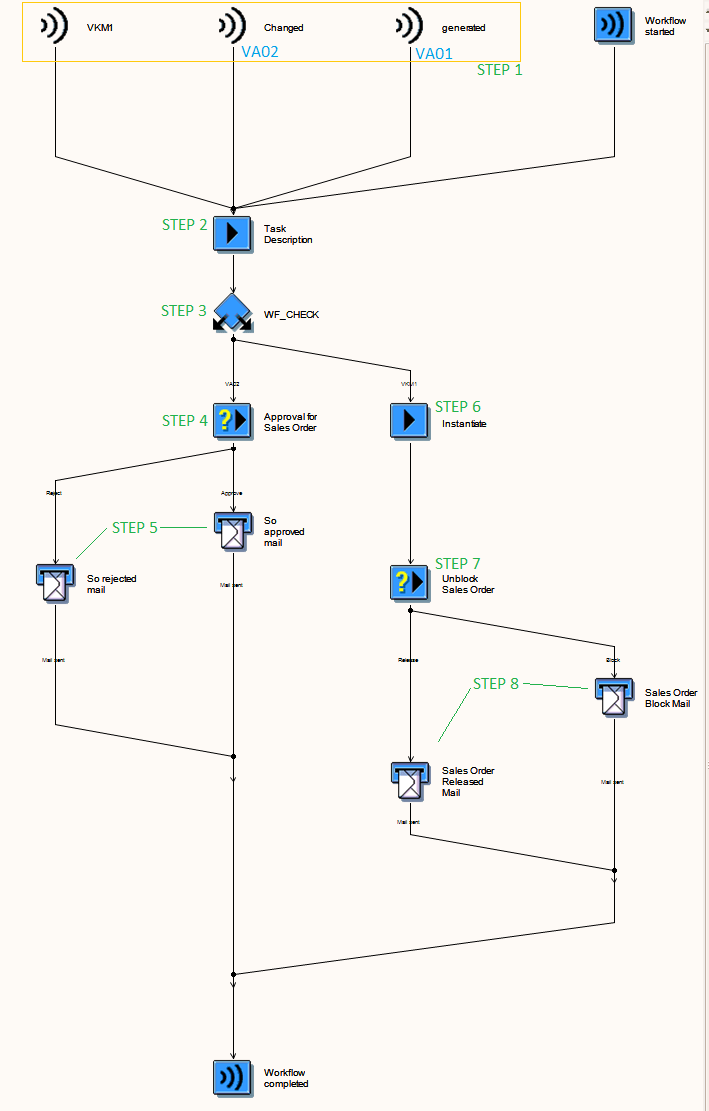
Step 1: Create workflow and register Events + Binding.
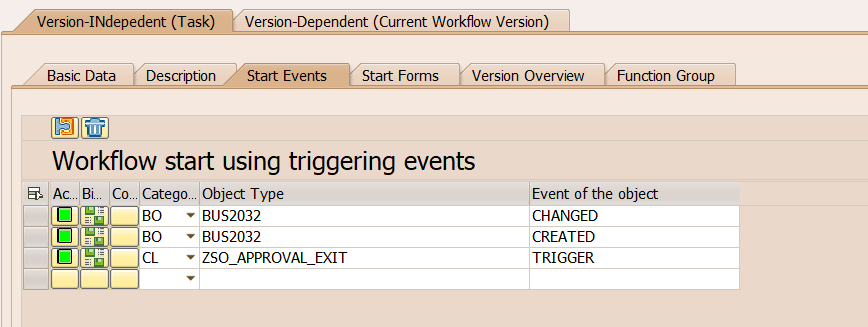
Goto SWDD and create a new workflow. After ‘Abbreviations’ and ‘Description’ in the ‘Basic Data’ tab, you can register events in the ‘Start Event’ tab. Here, we have two events of standard BO “BUS2032” and one custom event of class “ZSO_APPROVAL_EXIT“.
( Screenshot – 5 )
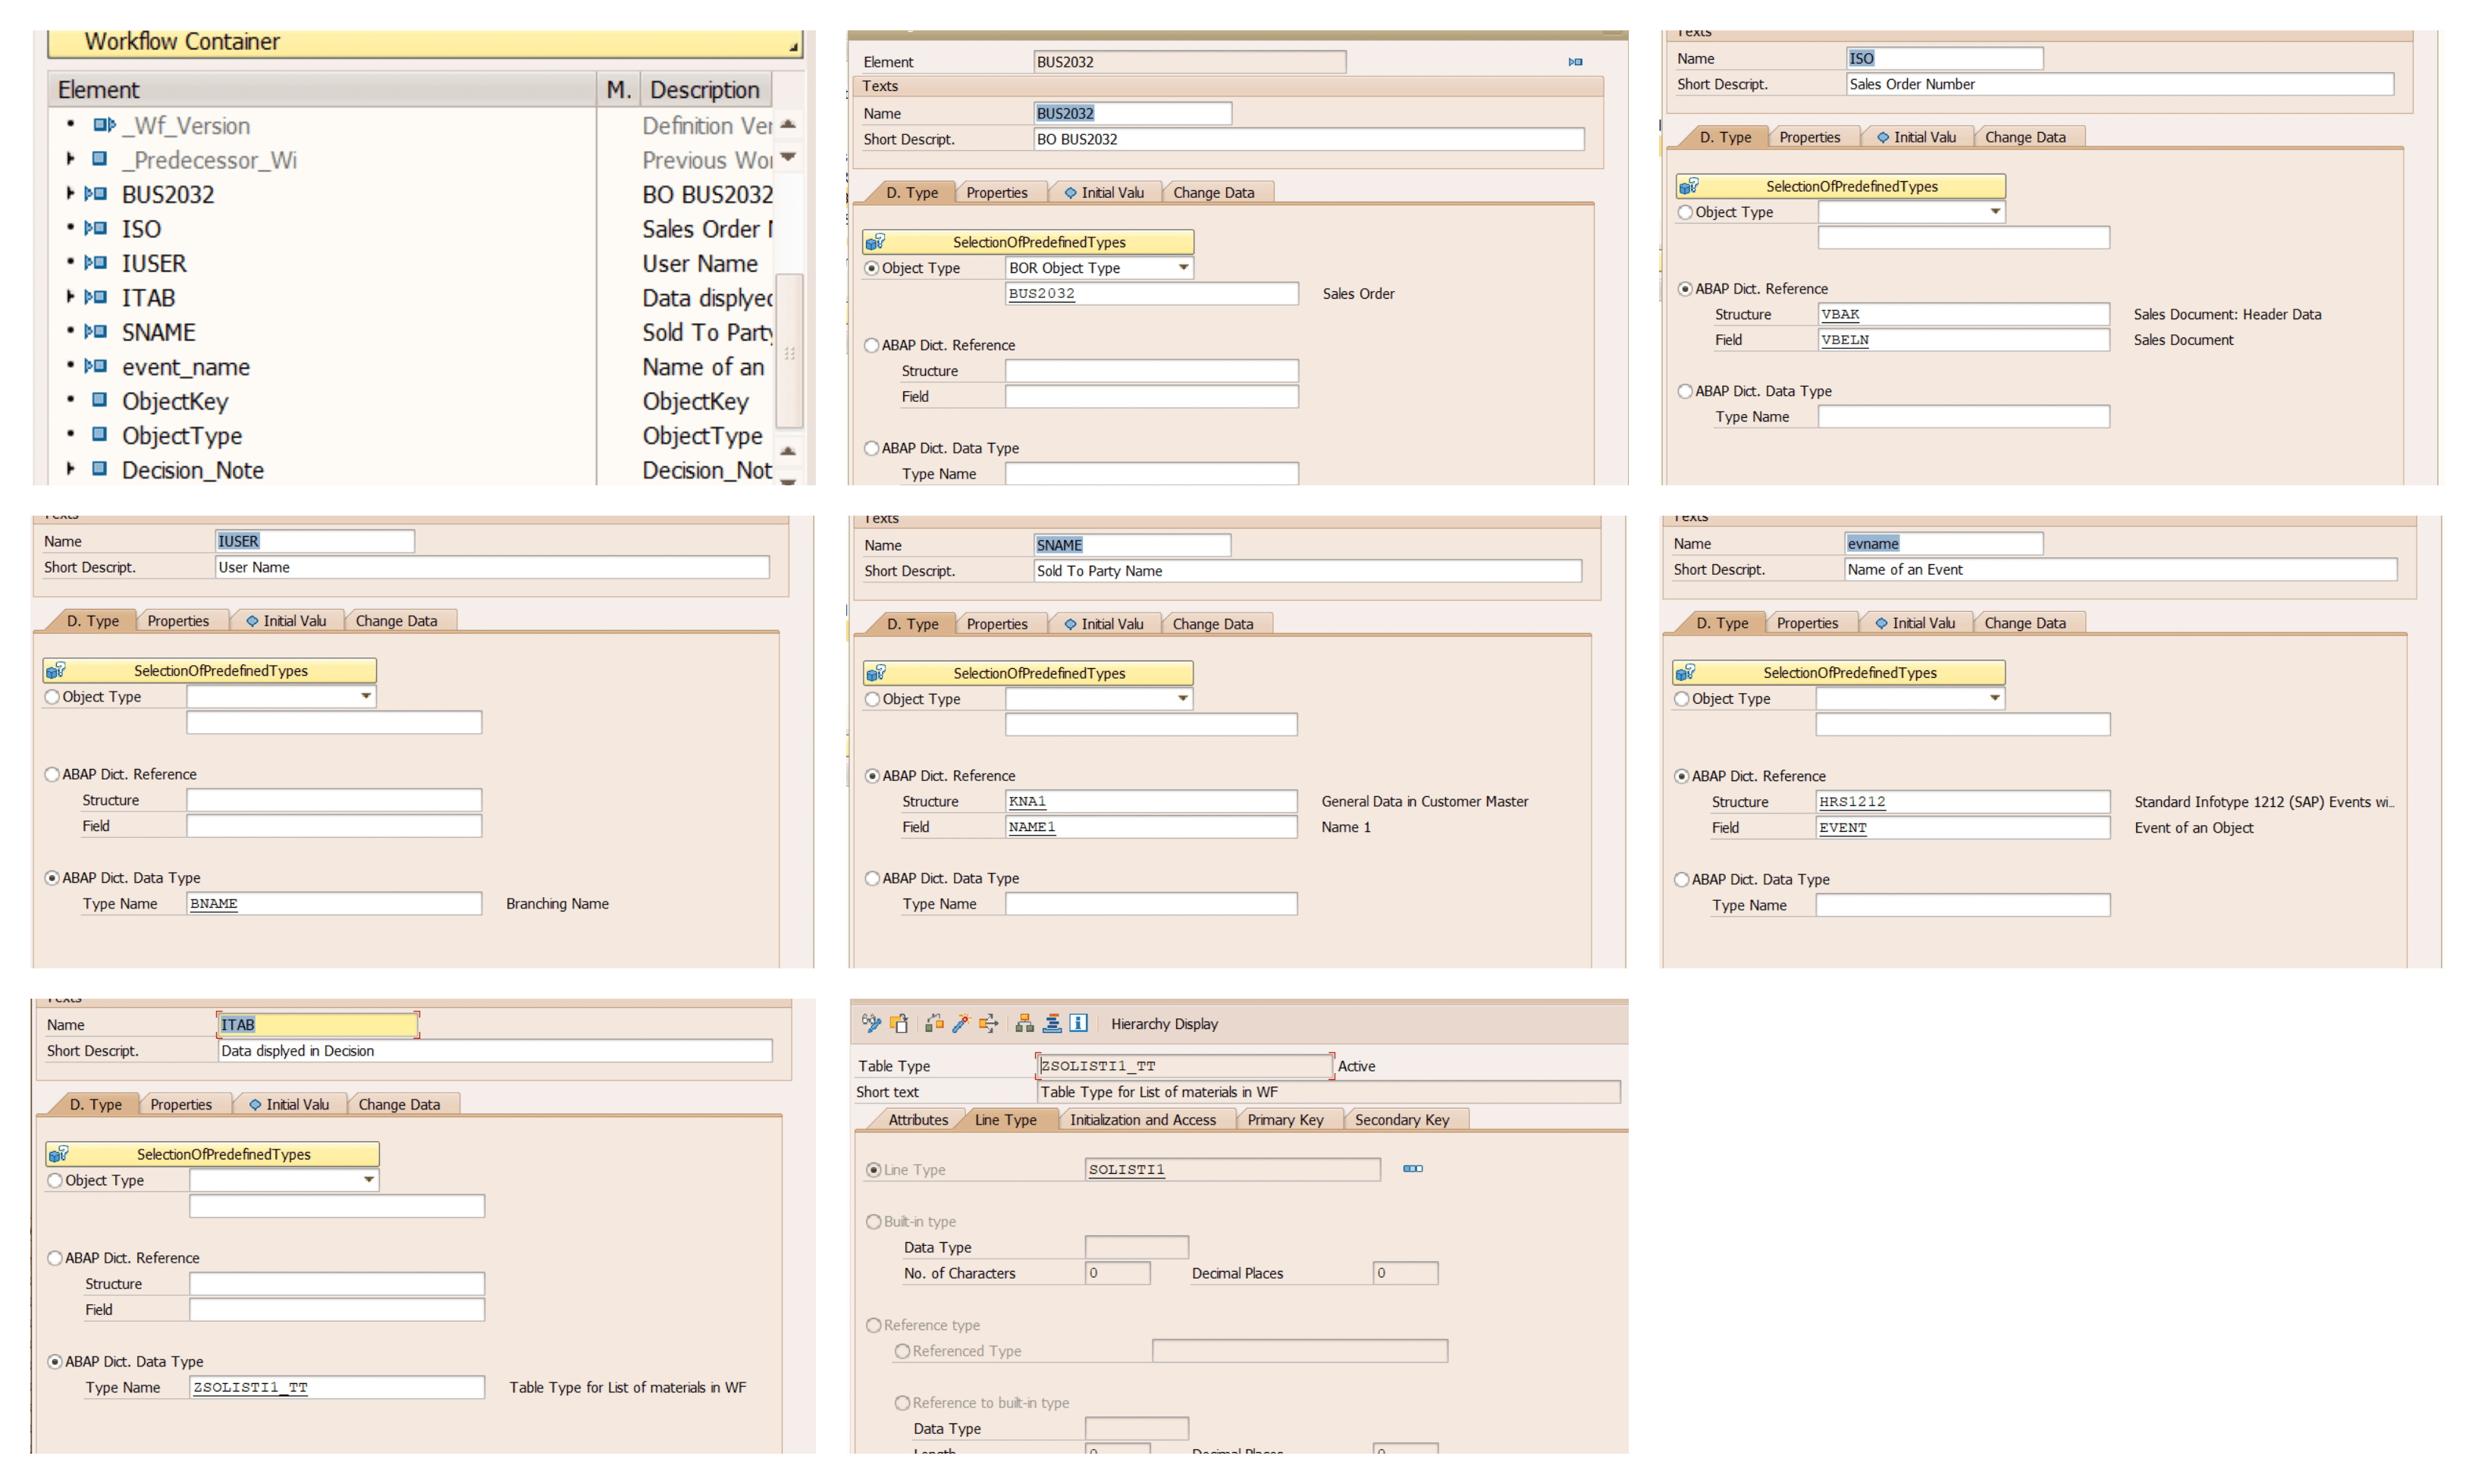
Create following workflow container elements before binding them to the events.
Workflow Container.
ITAB stores HTML Content
ISO stores VBELN
IUSER stores userid while workflow triggered for Credit Release.(VKM1)
BUS2032 is BO which will be used for Credit Release.(VKM1)
( Screenshot – 6 )
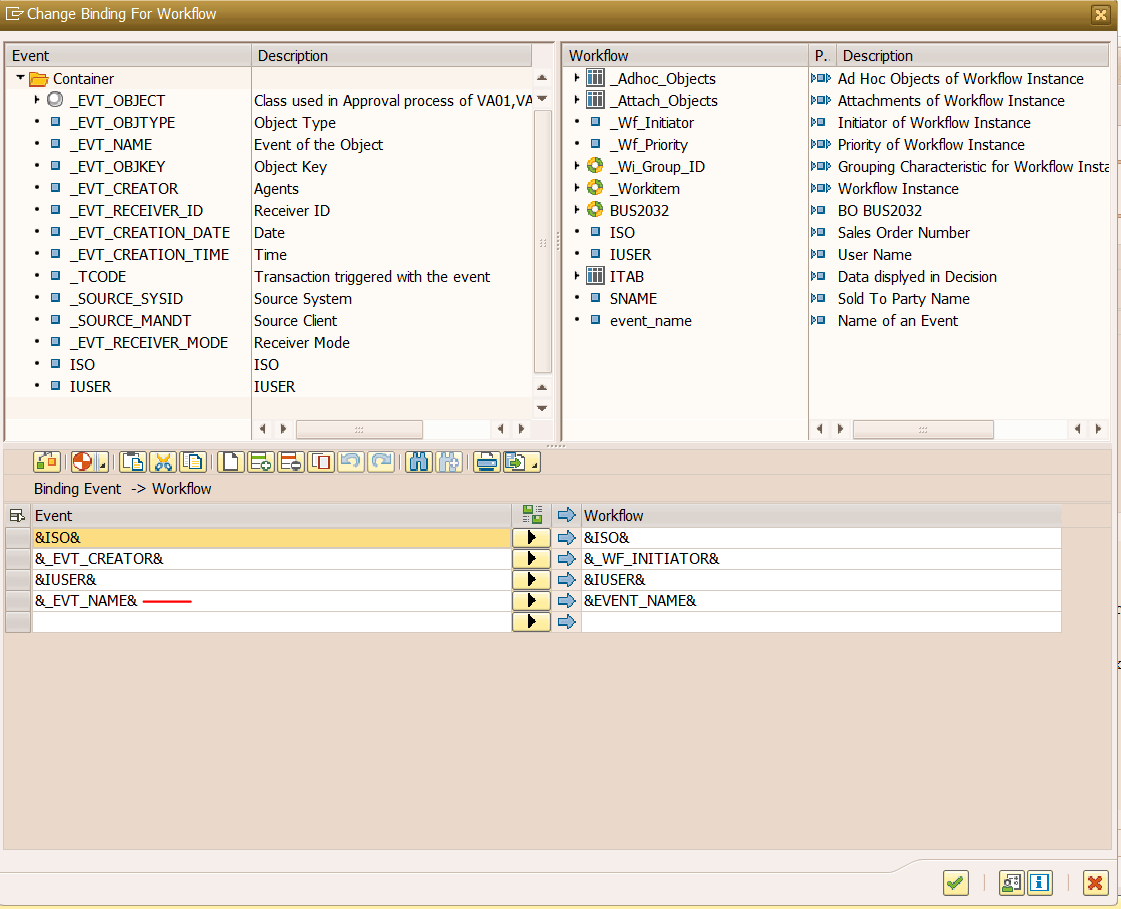
Binding will be the same for “CREATED” and “CHANGED” events. The required container element will receive some value whenever a sales order is created or changed.
( Screenshot – 7 )
Binding for “TRIGGER” event of class ZSO_APPROVAL_EXIT. This event will be triggered manually if SO is in Credit Block in FORM USEREXIT_SAVE_DOCUMENT ofMV45AFZZ UserExit or from some BADI.
( Screenshot – 8 )
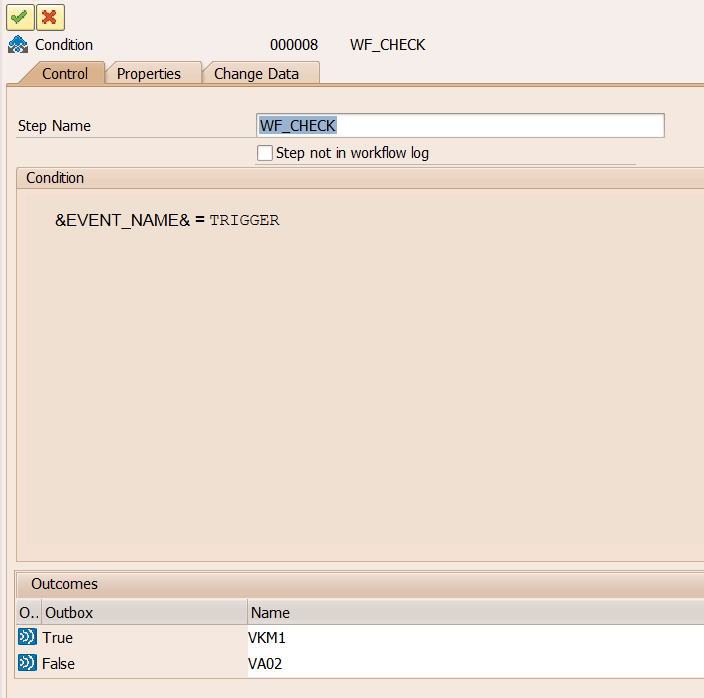
Note : &EVENT_NAME& will be used to identify the triggered workflow, i.g. workflow is triggered by VA01(Created) or VA02(Changed) or VKM1(Trigger).
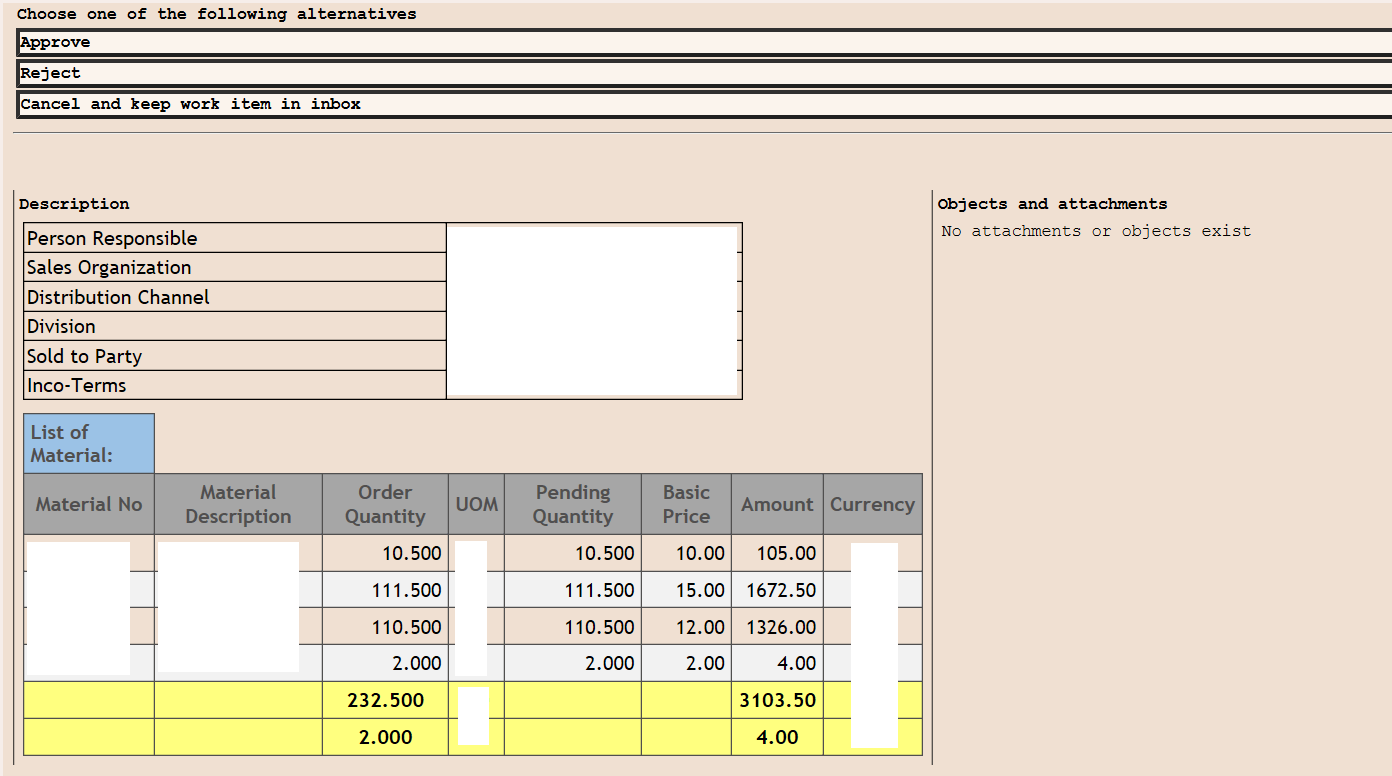
Step 2: Common task that will generate SO Details with List of Materials in HTML format.
Below is a sample output of this task that generates HTML content filled with required Sales Order details including a list of materials.
( Screenshot – 9 )
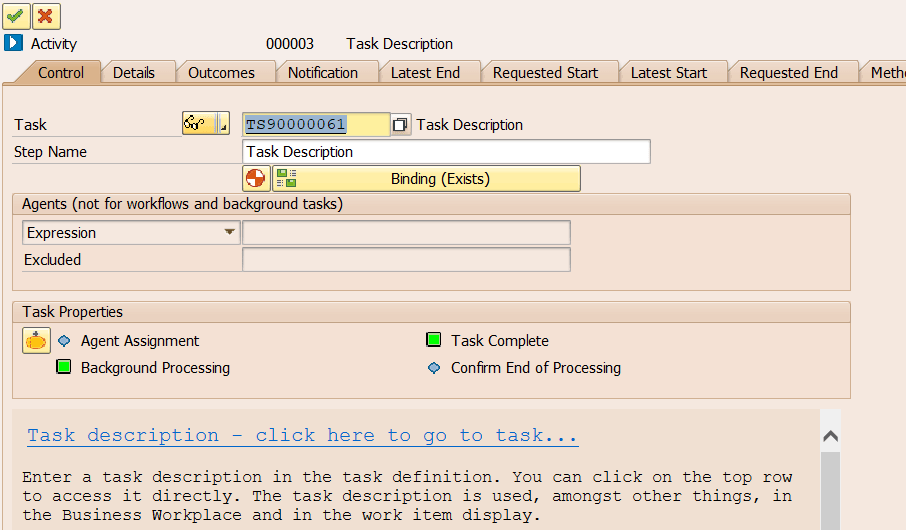
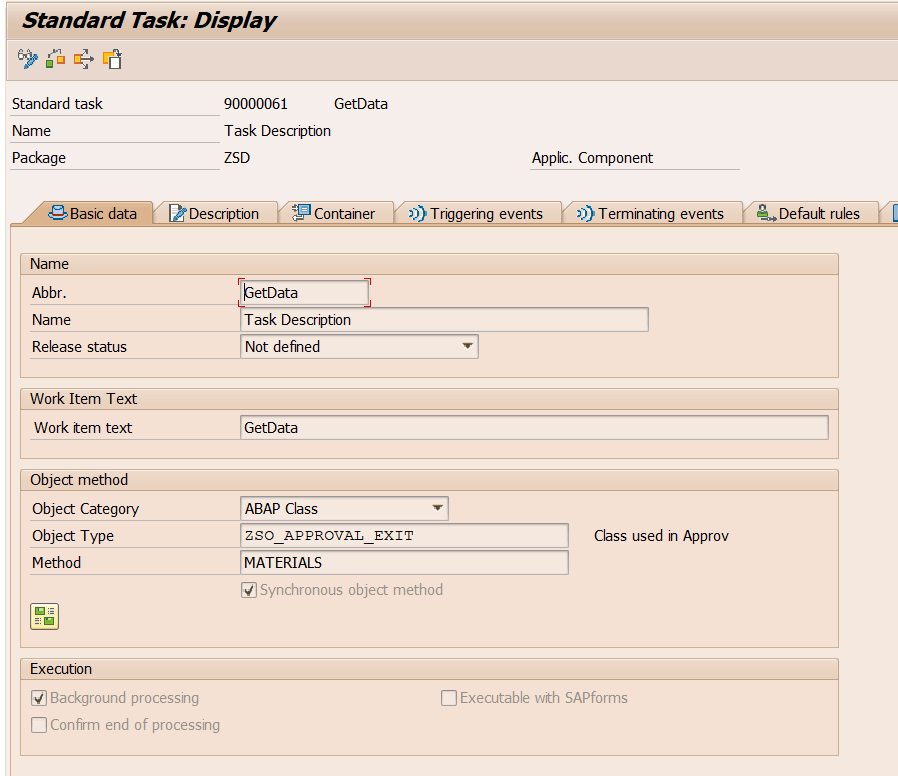
Create an activity with a custom task. ( Screenshot – 10 )
Fill the required field and select Object Category “ABAP Class” and in Object Type “ZSO_APPROVAL_EXIT” with Method “MATERIALS”. So each time this method gets called whenever any of the workflows is triggered. Don’t forget to make this task “BACKGROUND PROCESSING”.
( Screenshot – 11 )
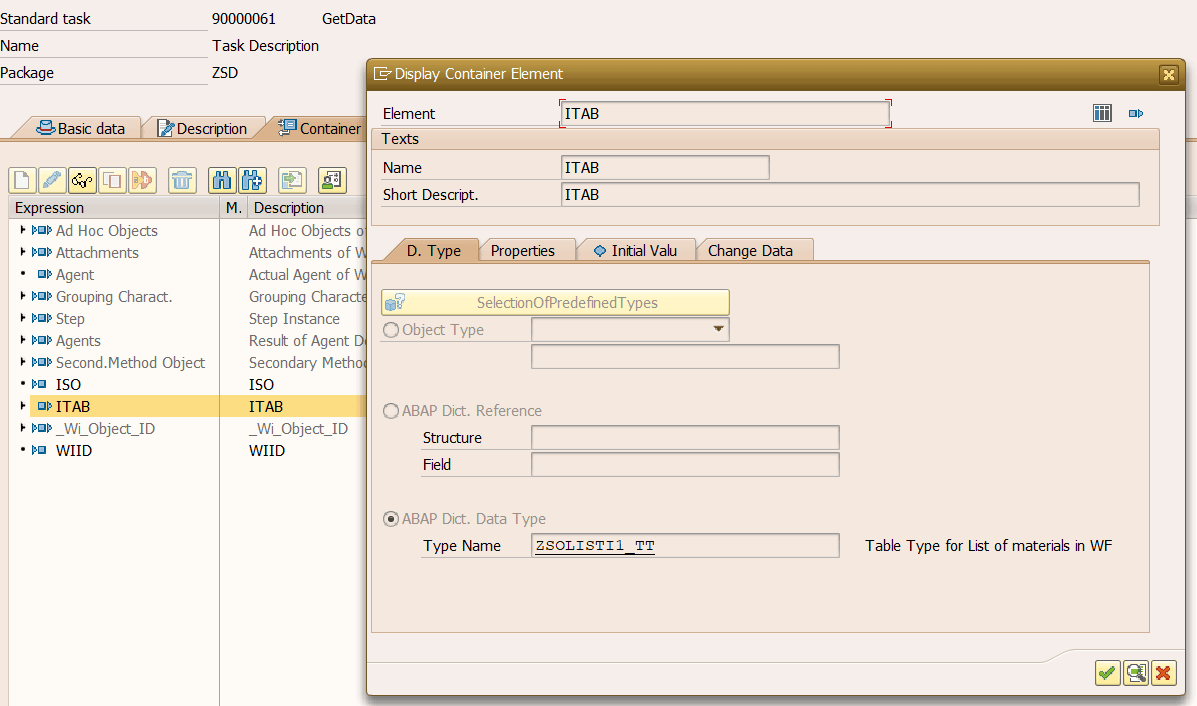
In the Container tab declare ITAB with typed ZSOLISTI1_TT( which is Table Type of SOLISTI1 ). So whole HTML content will be stored in this Container Element and this ITAB is going to be placed in UserDecision Task for both workflows.
( Screenshot – 12 )
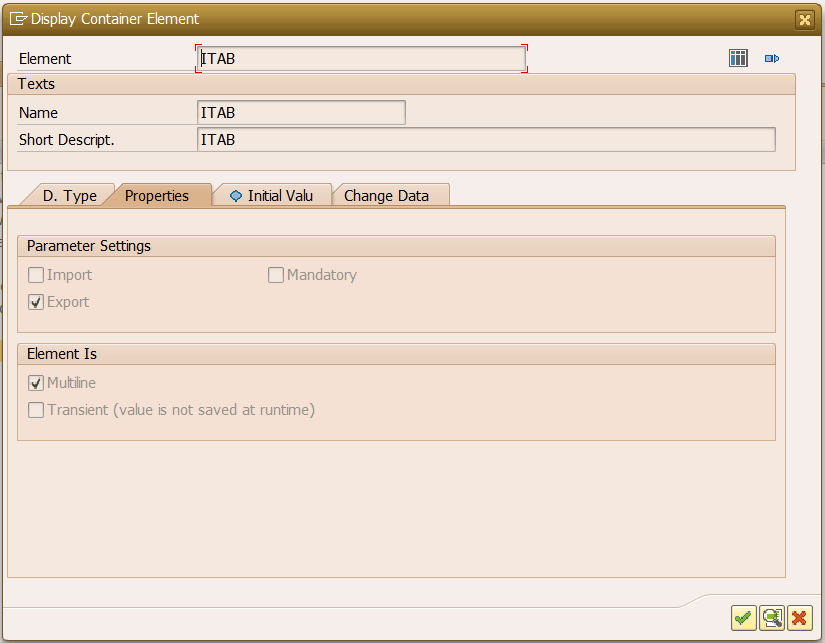
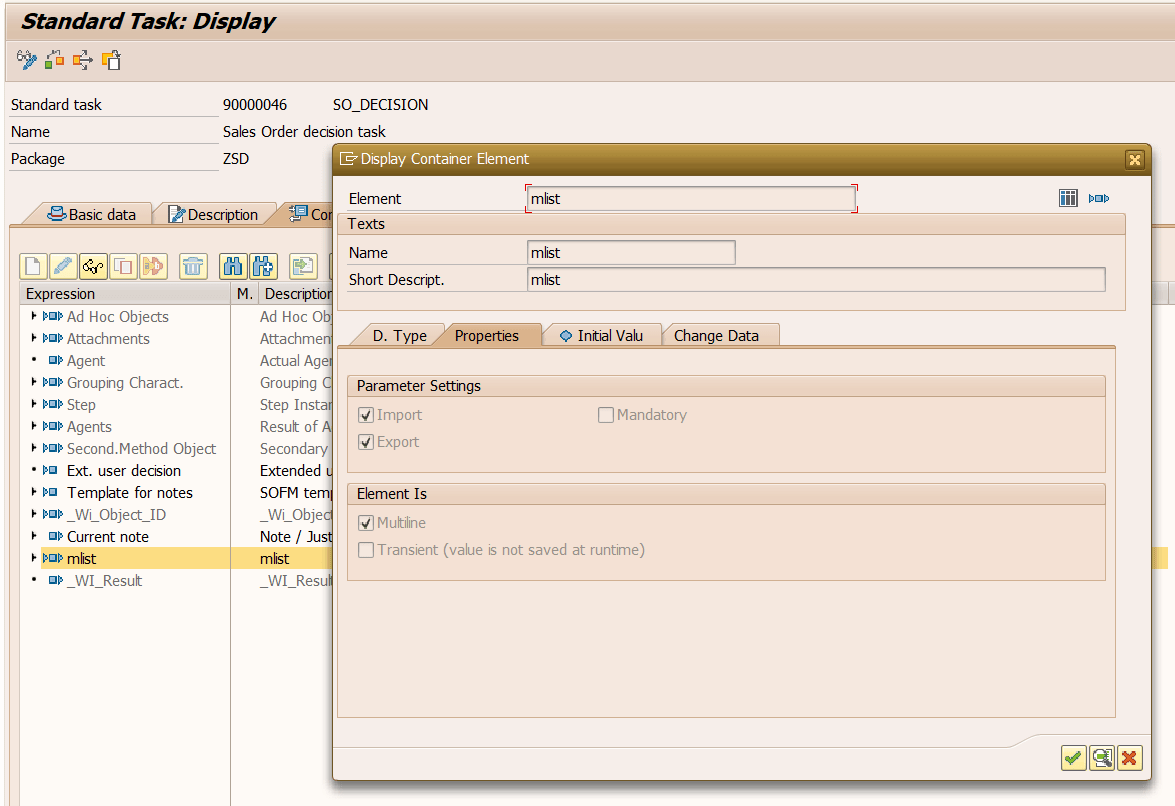
It is declared with TableType so Multiline is by default checked but in Parameter Settings check the Export checkbox. Because we are receiving HTML in it.
( Screenshot – 13 )
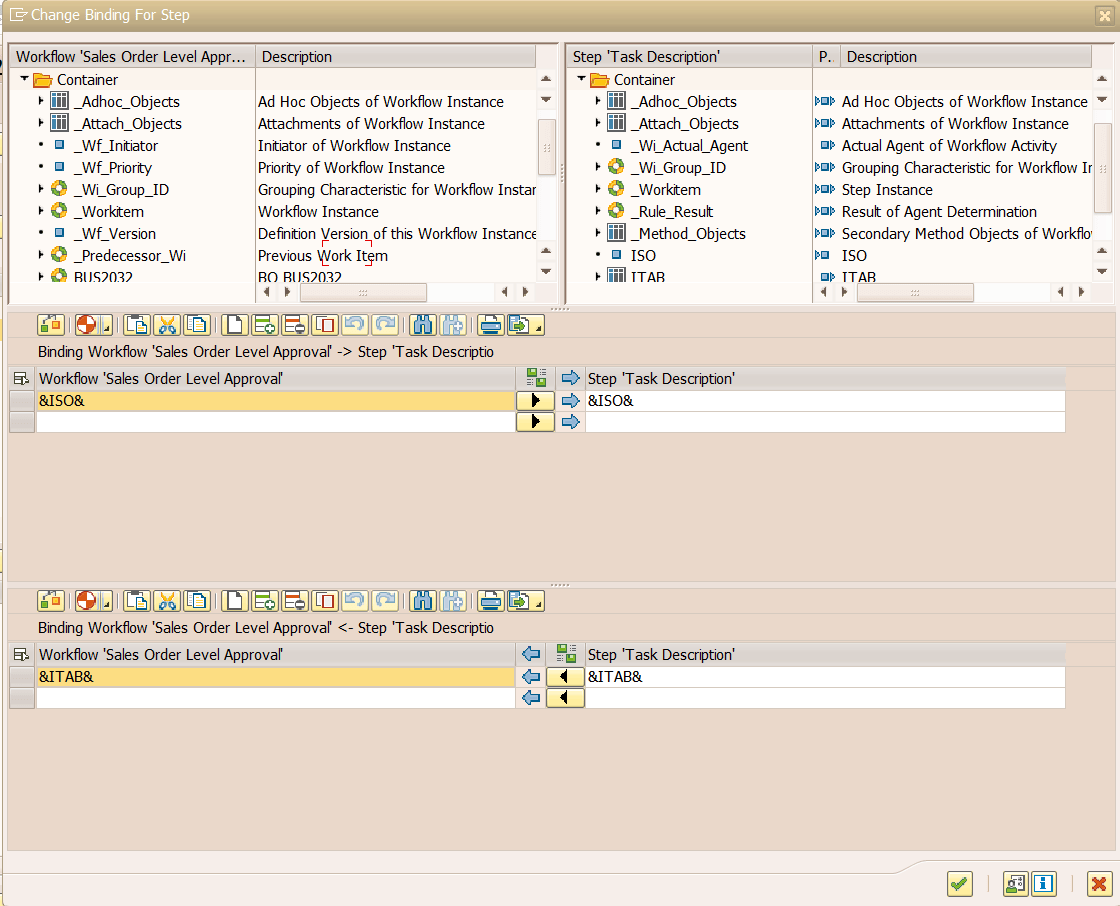
The Binding for this Task is simple. Just you have to pass &ISO& to MATERIALS method and it will return &ITAB&. ( ISO is Sales Order number )
( Screenshot – 14 )
Step 3: Condition to identify workflow. (Condition 000008)
Create a condition step to identify which workflow should trigger. If event_name is “CREATED” or “CHANGED” it will trigger Sales Order Approval workflow and if event_name is “TRIGGER” it will trigger a workflow to release Sales Order from Credit Block.
( Screenshot – 15 )
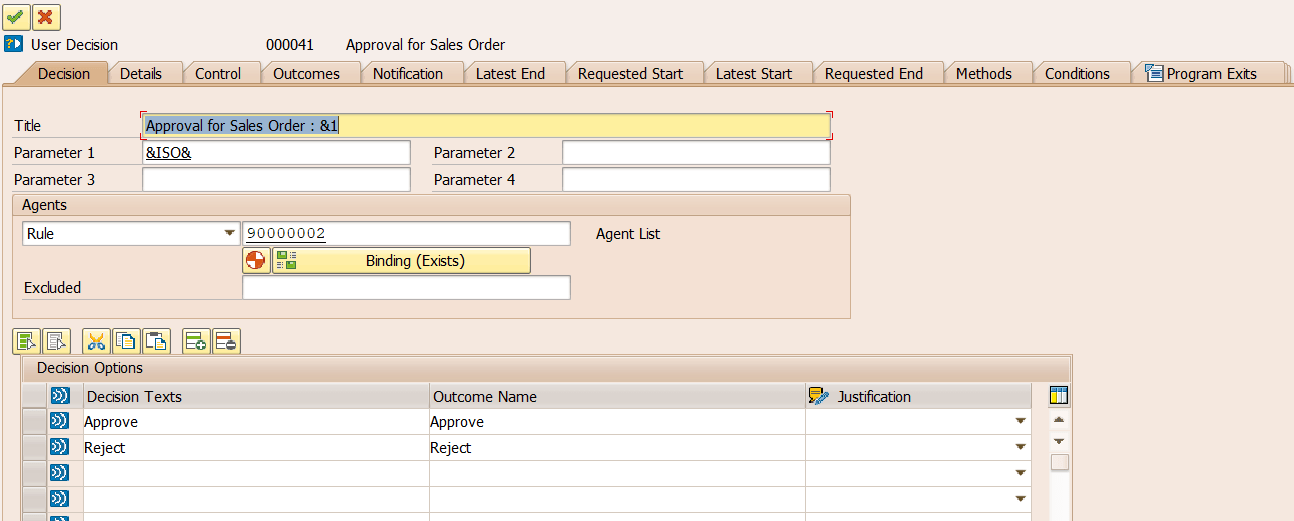
Step 4: Let us assume EVENT_NAME is ‘CREATED’ or ‘CHANGED’. That means workflow triggered from VA01 or VA02. ( User Decision 000041 )
Create User Decision step with “Approve” and “Reject” buttons. Pass &ISO& in parameter 1 so it can be used in Title ” Approval for Sales Order: &1″ . &1 is our Sales Order Number. Here agent assignment is dynamic. You can skip this part for now.
( Screenshot – 16 )
In the Control tab, create a new task, and do not forget to make “General Task” in Task Properties.
( Screenshot – 17 )
Assign ZSO_APPROVAL_EXIT in the Program Exits tab. So after taking a decision, it will call that class, and here we can perform operations based on the decision.
( Screenshot – 18 )
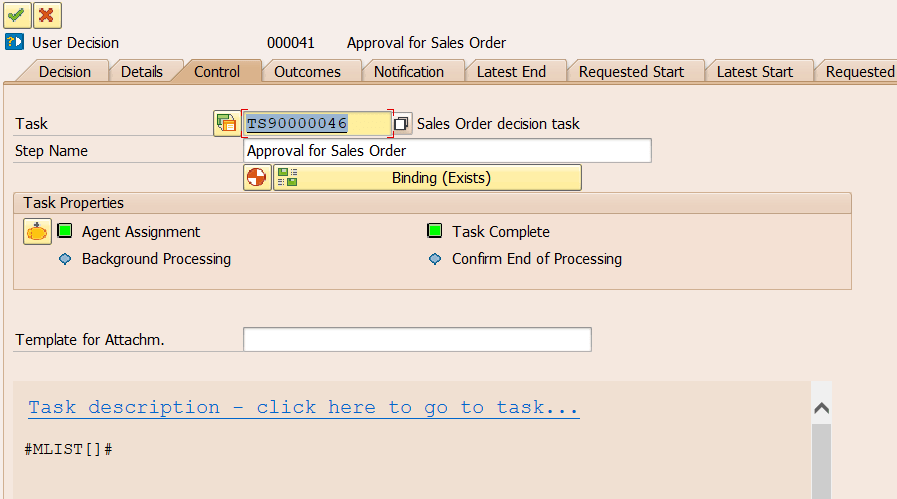
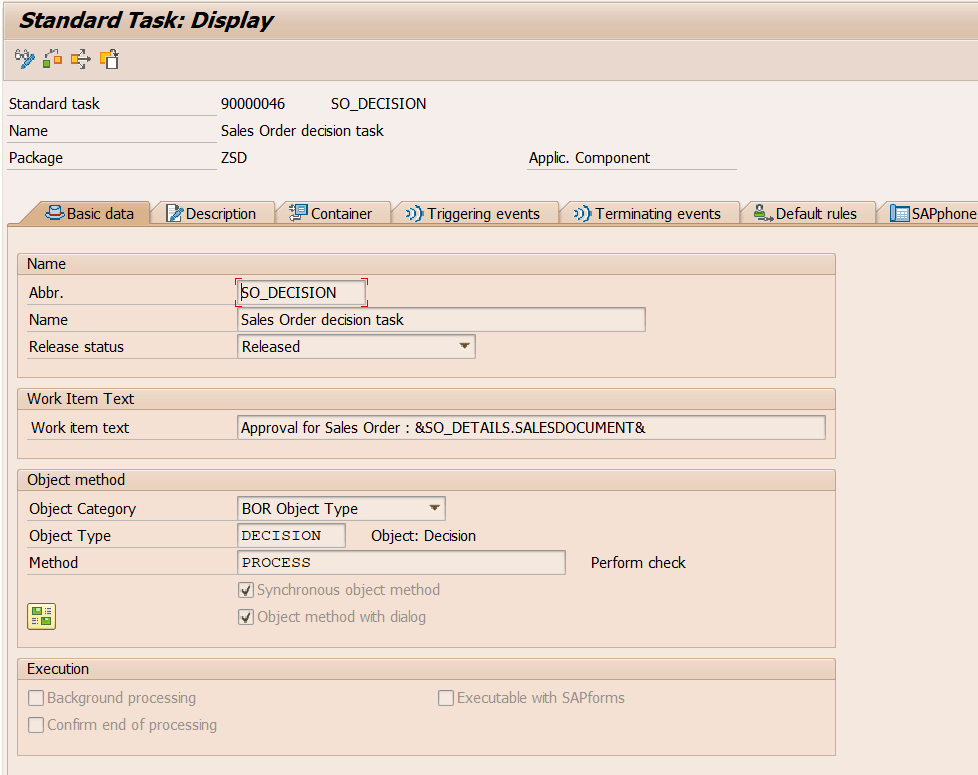
Double click on Task “TS90000046” in the control tab. Fill all fields as below.
( Screenshot – 19 )
In the container tab, create an element with “MLIST” with the same type as we created “ITAB”. Here the lines of ITAB will be stored in “MLIST”.
( Screenshot – 20 )
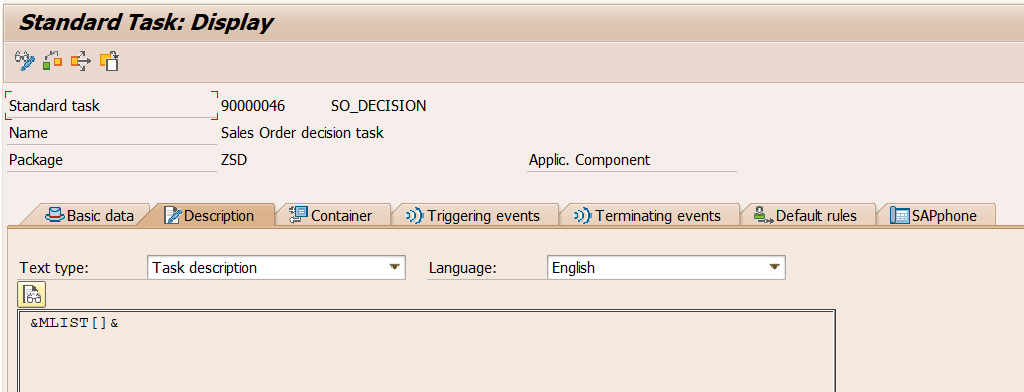
Now simply declare “&MLIST[]&” in the Description tab. The whole HTML content will be displayed in User Decision BODY.
( Screenshot – 21 )
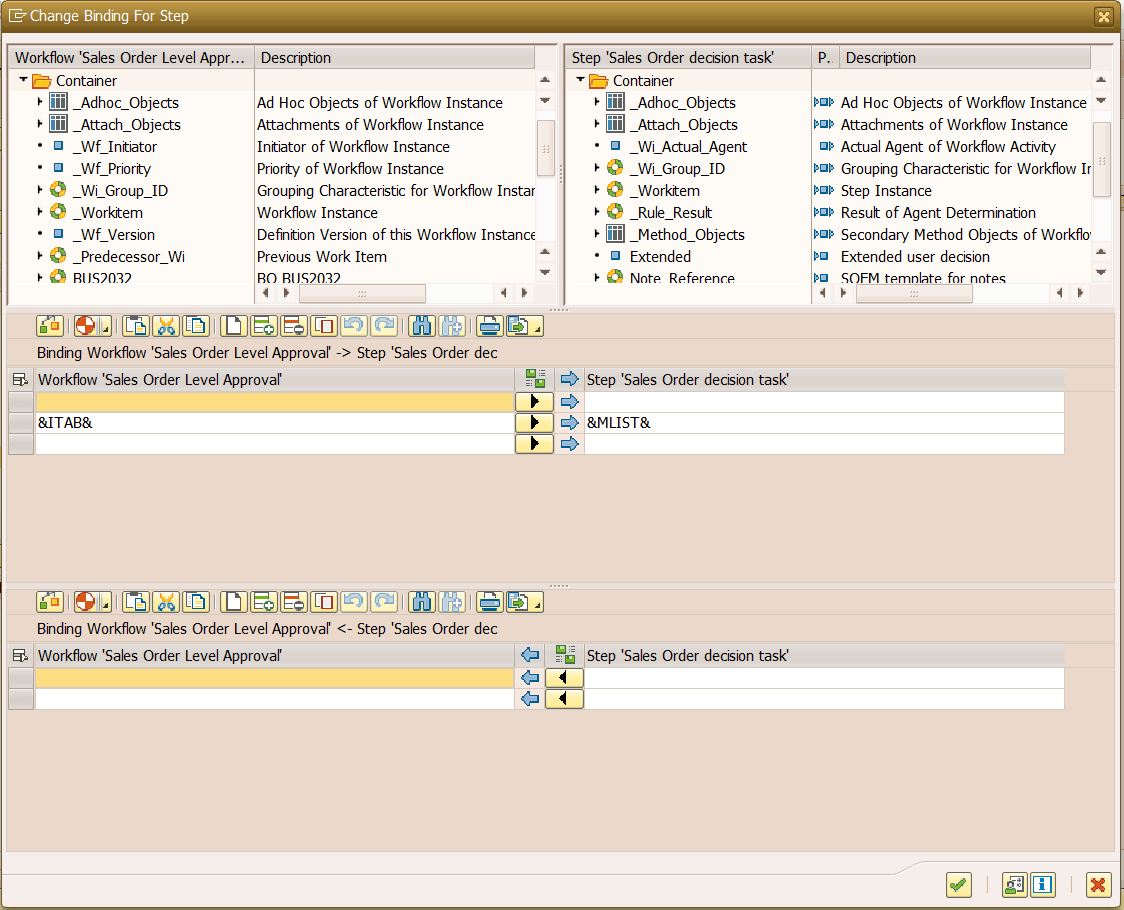
Binding for Task “TS90000046”, assign ITAB to MLIST. ( Screenshot – 22)
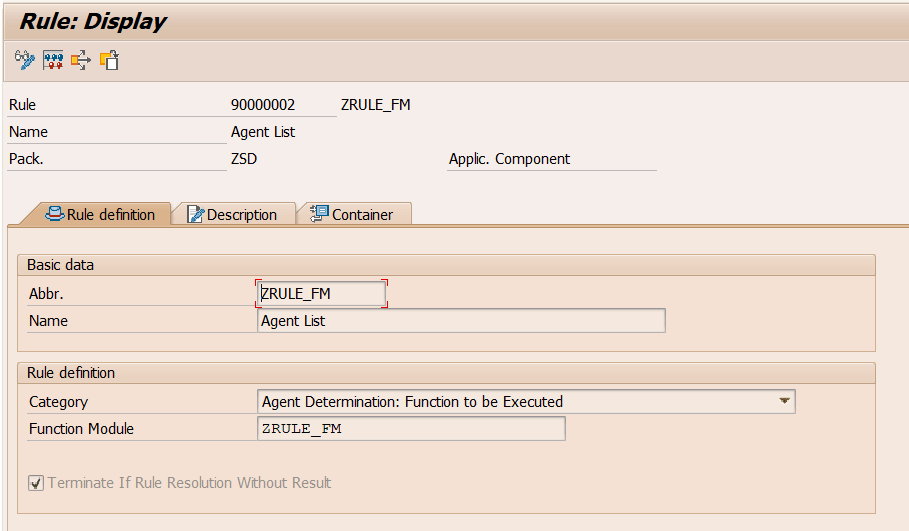
Goto decision tab, create a new rule and double click it. Fill the required field and in Rule Definition select “Agent Determination: Function to be Executed” and Function Module “ZRULE_FM“. (Need to create ZRULE_FM first before activating this agent assignment). Do not forget to check “Terminate If Rule Resolution Without Result.
So if there is no agent received for a particular SO, it will not trigger/dump workflow.
( Screenshot – 23 )
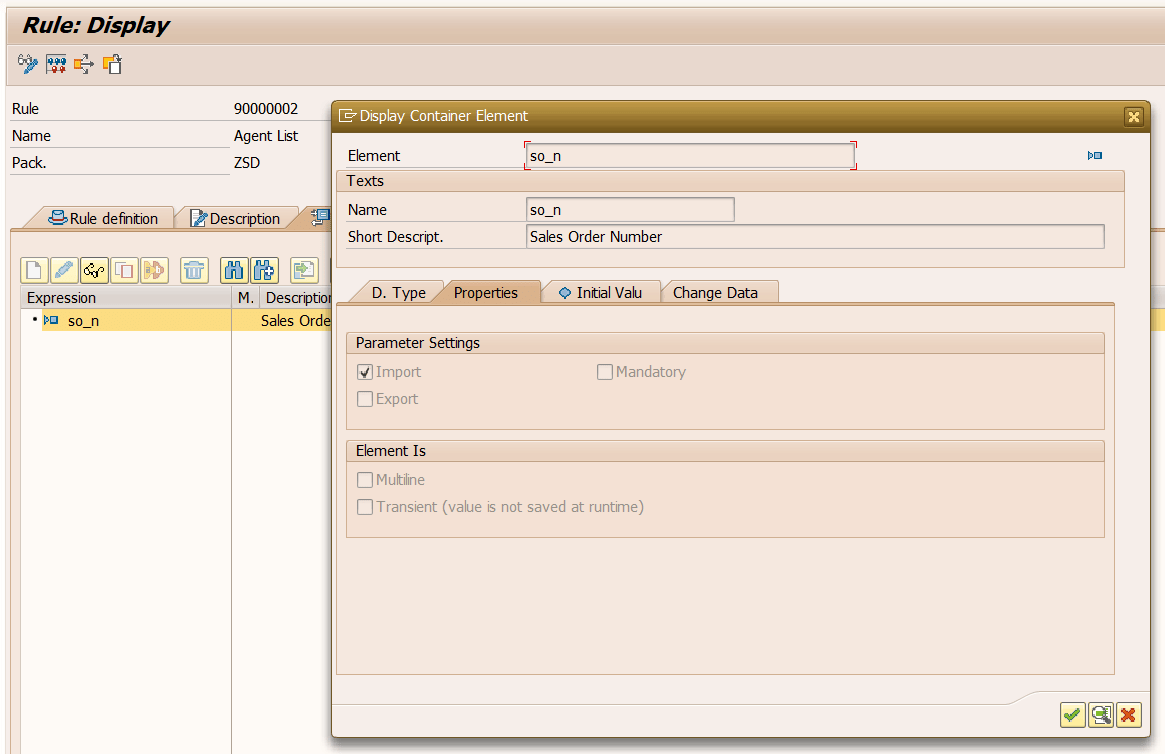
In the container of this Rule, create an element with the type VBELN and make it Import. ( Screenshot – 24)
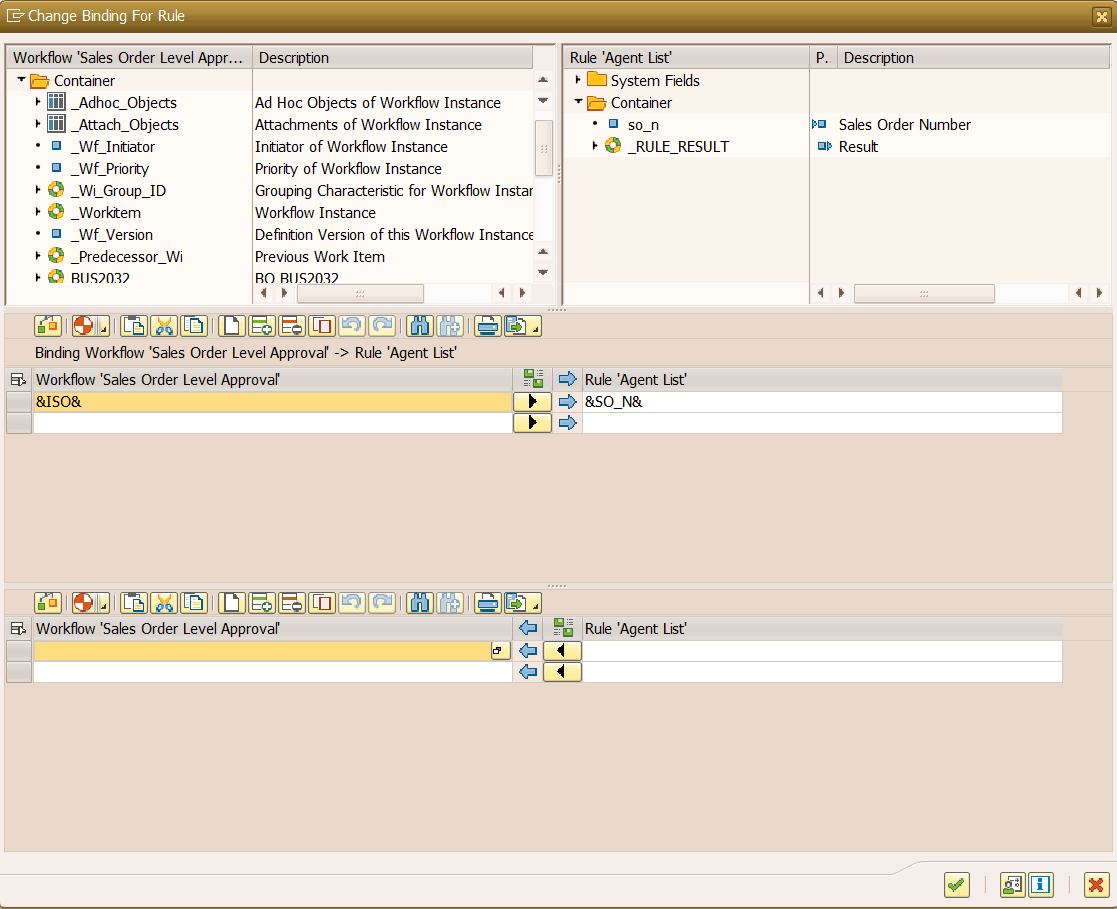
Binding is again simple for this, just pass ISO. ( ISO is sales order number ) ( Screenshot – 25 )
As we did binding above for the Rule, there is an element ISO passed to SO_N. This SO_N will be received in ZRULE_FM in wa_container-value. Based on that VBELN we can get agent from our Custom Table. Append that user-id retrieved from ZSO_APPROVAL to actor_tab.
( Code – 1 )
DATA : wa_actor     TYPE swhactor,
       wa_container TYPE swcont.
DATA : lv_lines TYPE i.

  READ TABLE ac_container INTO wa_container.
  IF wa_container-value IS NOT INITIAL.

*** Sales Order Number(VBELN) will be received in [wa_container-value]
*** Based on that you can find Sales Order Amount and than pass it to ZSO_APPROVAL table
*** So you will get list of approvers.

      wa_actor-otype = 'US'.
      wa_actor-objid = wa_soapp-userid.
      APPEND wa_actor TO actor_tab.

  ENDIF.

  DELETE ADJACENT DUPLICATES FROM actor_tab COMPARING objid.
  DESCRIBE TABLE actor_tab LINES lv_lines.
  IF lv_lines EQ 0.
    RAISE nobody_found.
  ENDIF.
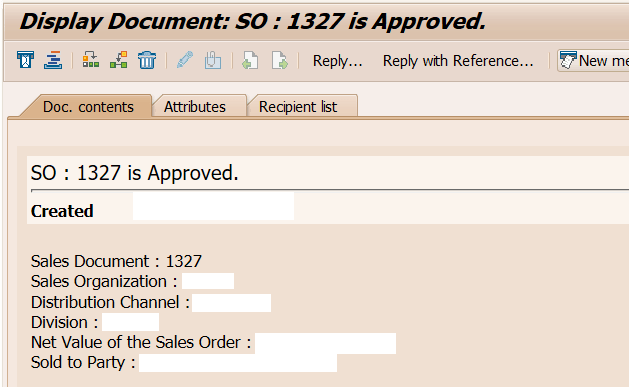
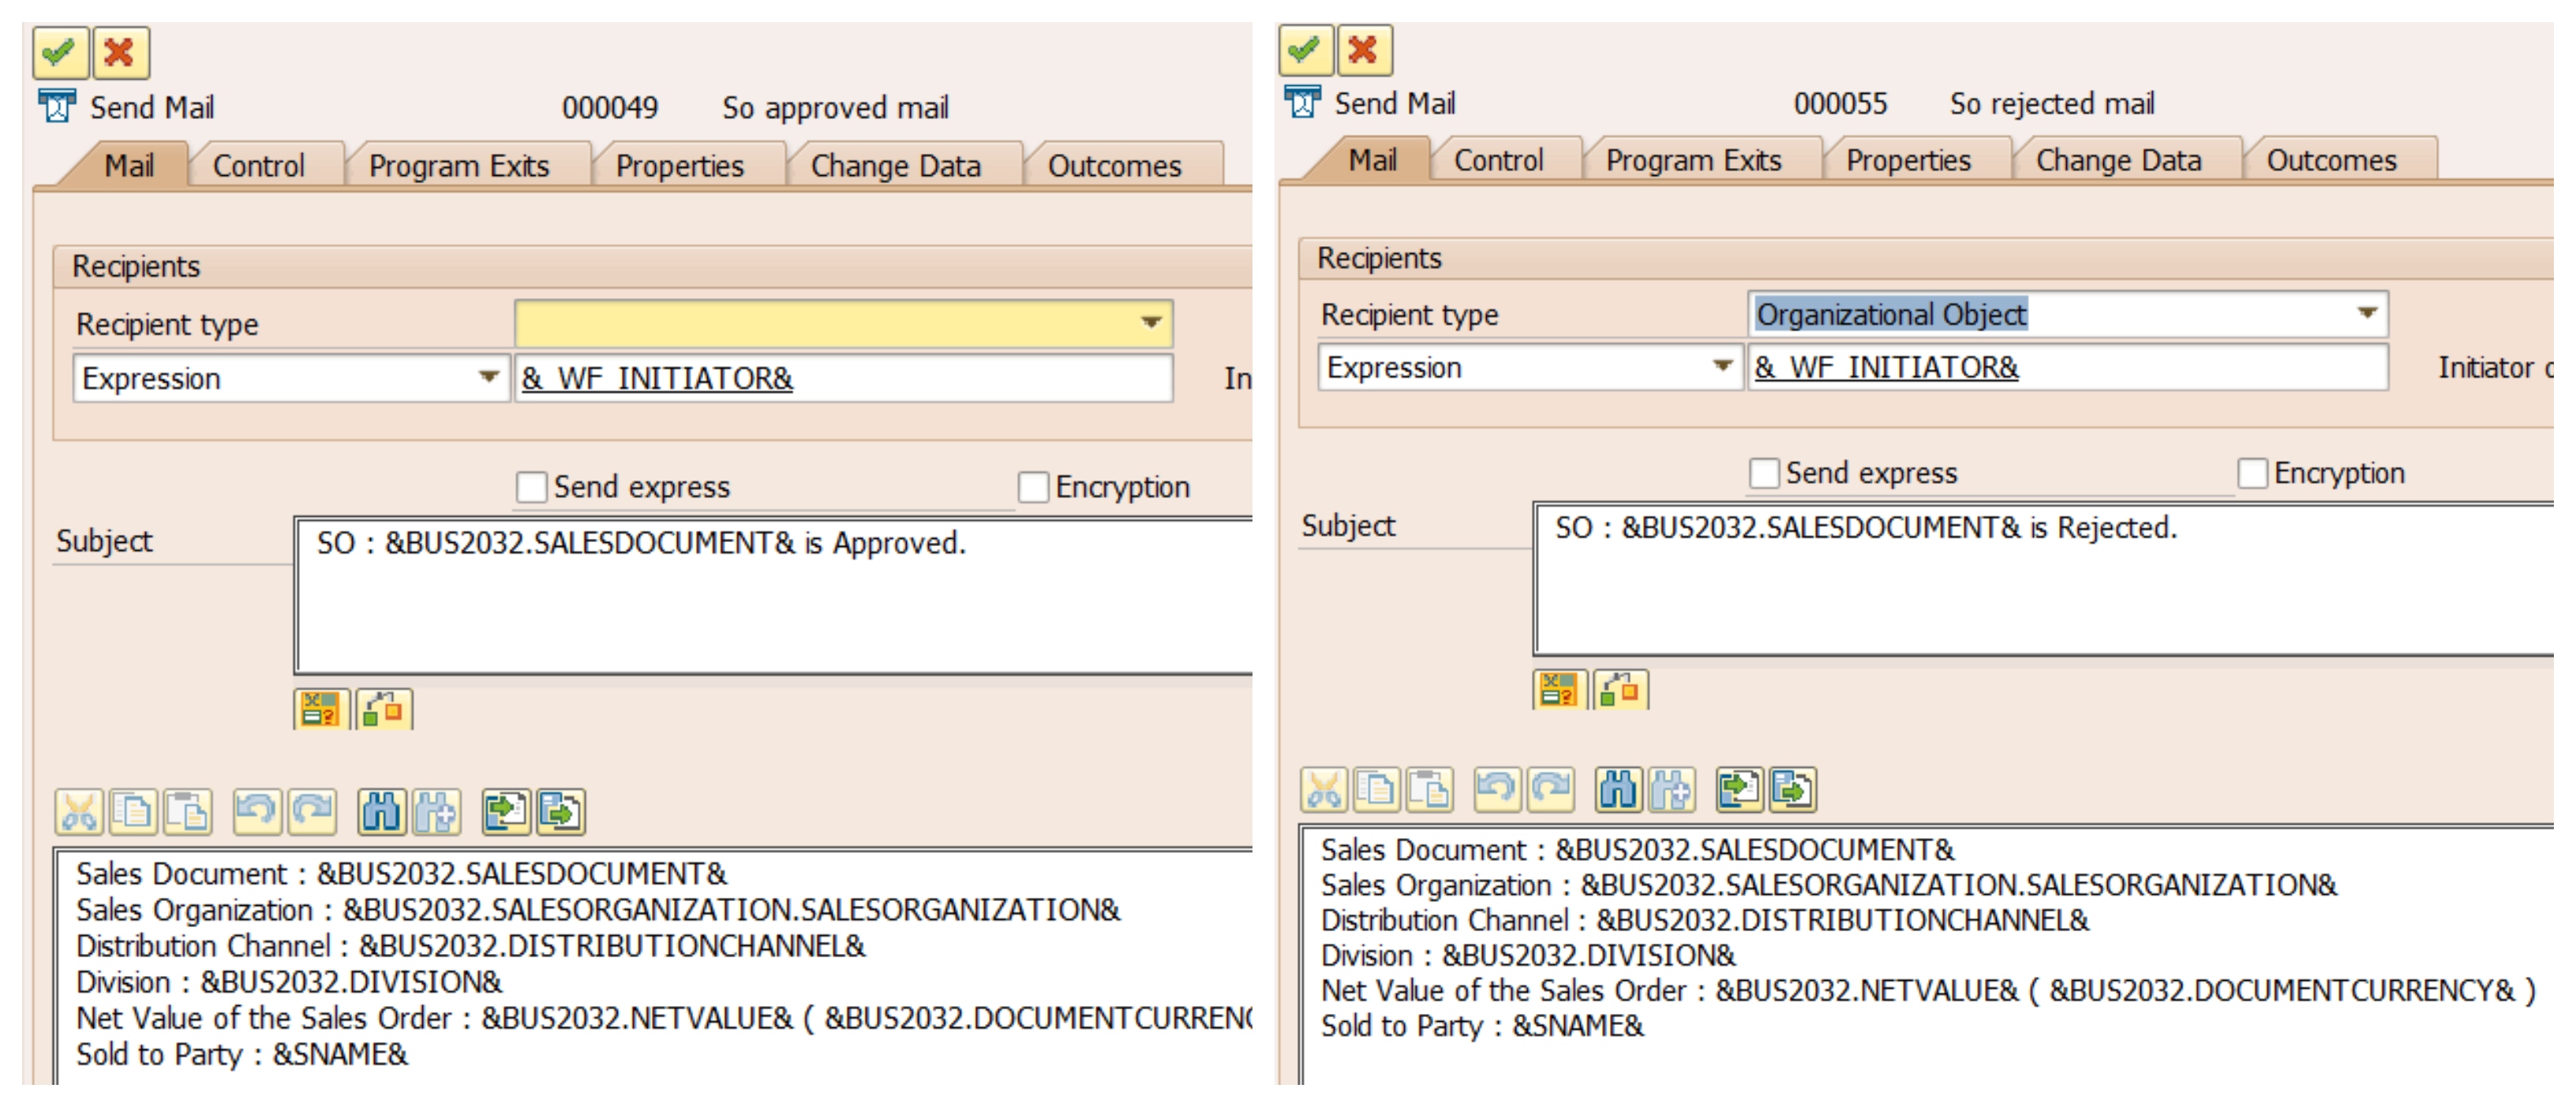
Step 5: Finally, Sales Order Approval acknowledgment will be sent to the workflow initiator.
This email will be received by a workflow initiator with decisions taken by the approver and sales order details.
( Screenshot – 26 )
Create Send Mail step to send mail to the initiator. Here BUS2032 container element have enough data regarding particular Sales Order. So you can use it as bellow.
( Screenshot – 27 )
Step 6:Let us assume EVENT_NAME is ‘TRIGGER’. This workflow trigger when SO is in Credit Block. So associated approver can release it without going into VKM1.
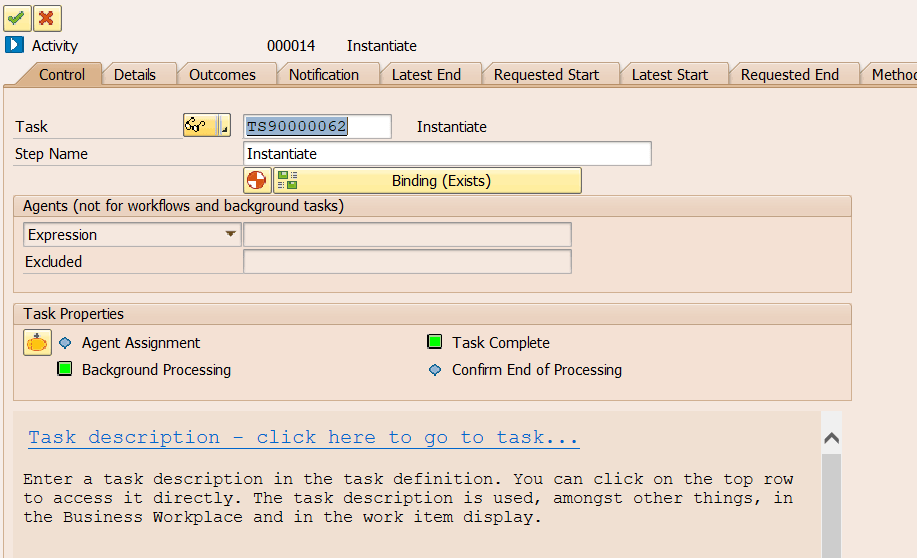
Create Activity and create a task to Instantiate BUS2032 BO by using the sales order number. This step is necessary because to get the complete details of a particular SO.
( Screenshot – 28 )
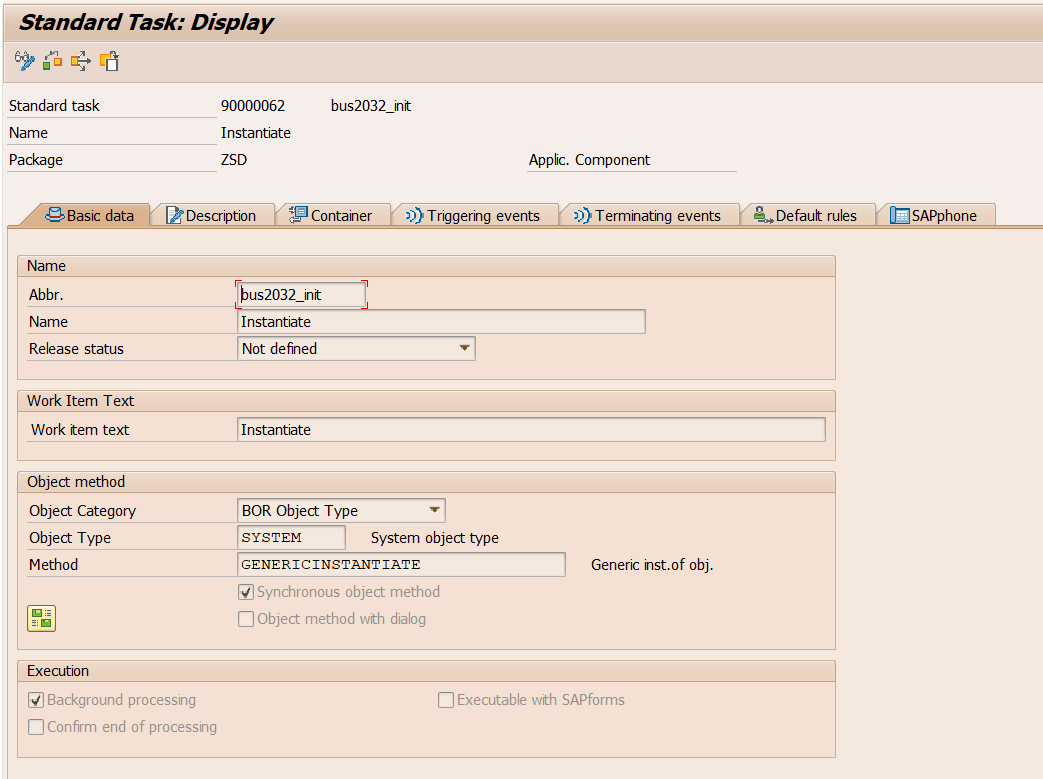
Double-click on task. Fill the required field and do not forget to check Background Processing.
( Screenshot – 29 )
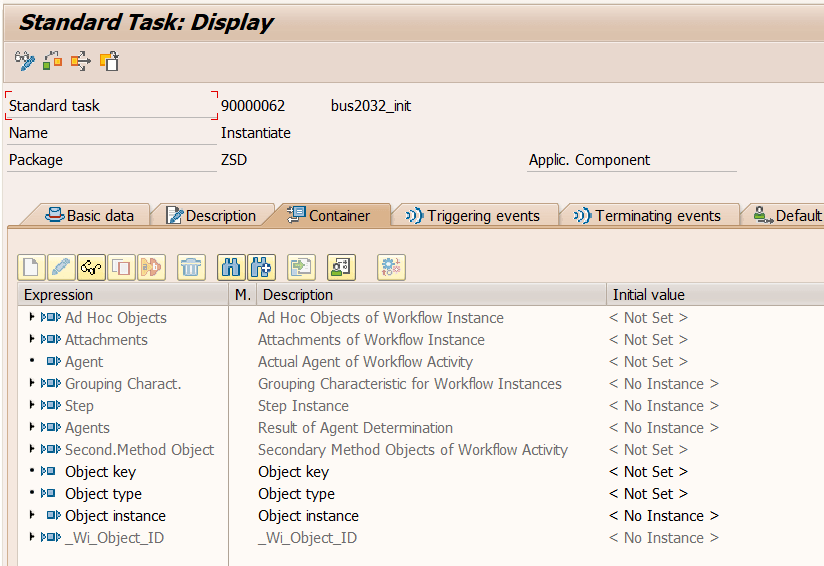
When you perform the above step, it will auto-generate Object Key, Object type, and Object instance.
( Screenshot – 30 )
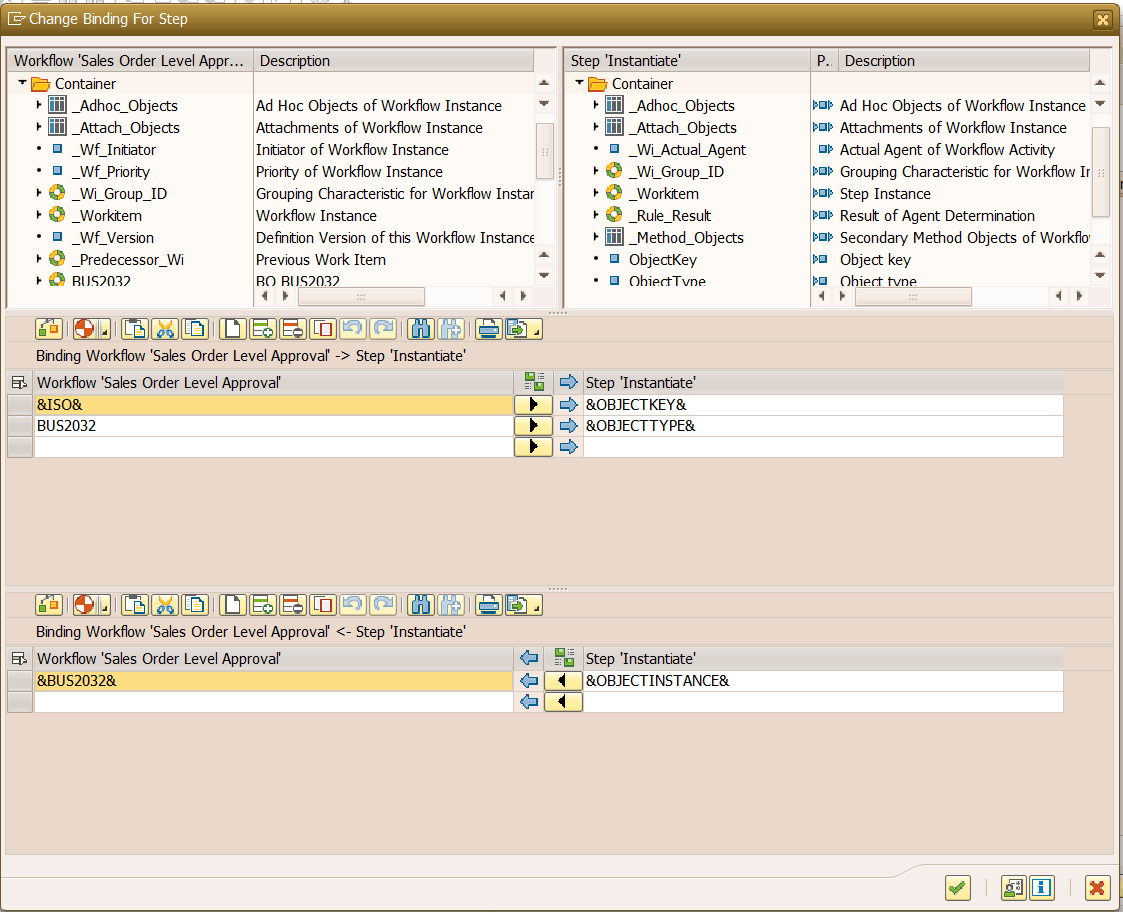
Pass ISO to Objectkey and BUS2032 ( as it is – string) to the Object type. So it will instantiate BO implicitly and return it to &BUS2032& Container Element.
( Screenshot – 31 )
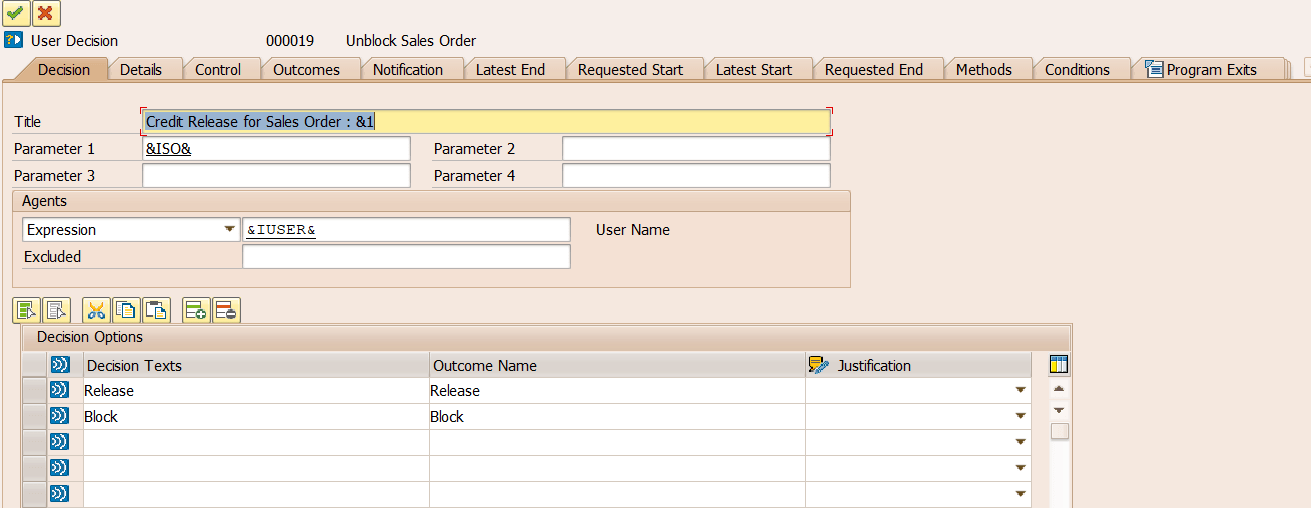
Step 7: User Decision for Credit Release.
Create User Decision with “Release” and “Block” buttons and pass Parameter1 with &ISO&. When we trigger the event manually from UserExit by calling ZSO_APPROVAL_EXIT-SET_PARAM method with &ISO& and &IUSER&.
( Screenshot – 32 )
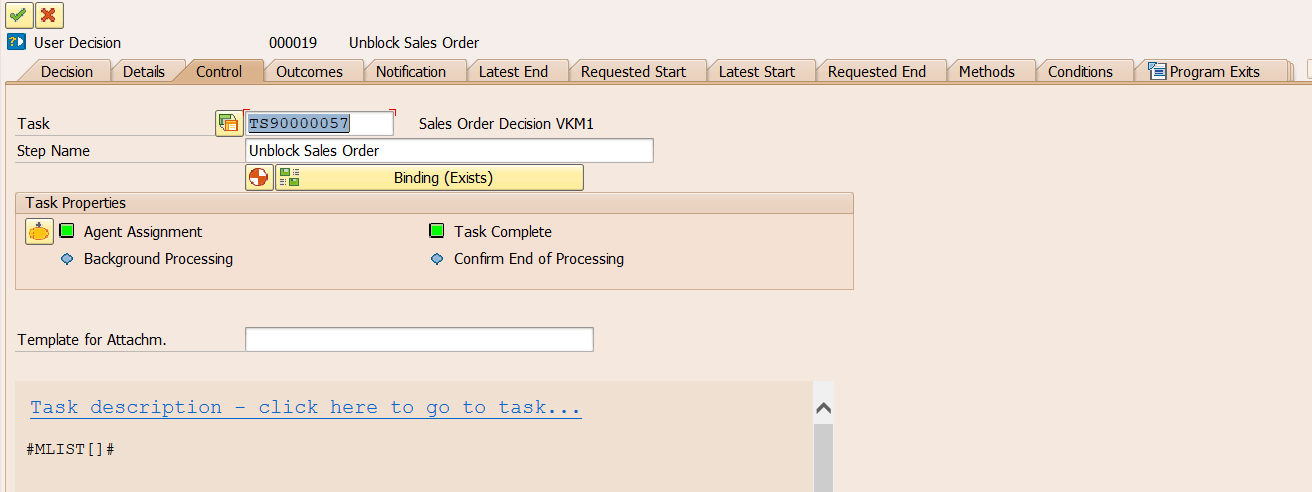
Create a new task “TS****” and do not forget to make “General Task” in Task Properties.
( Screenshot – 33 )
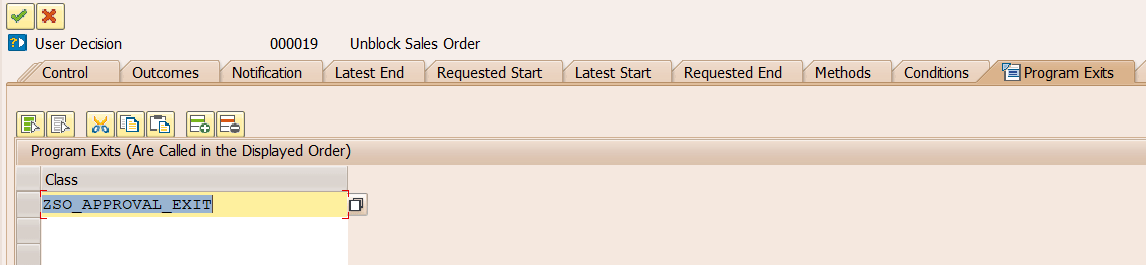
Assign ZSO_APPROVAL_EXIT in the Program Exits tab. So after taking a decision, it will call that class, and here we can perform operations based on the decision.
( Screenshot – 34 )
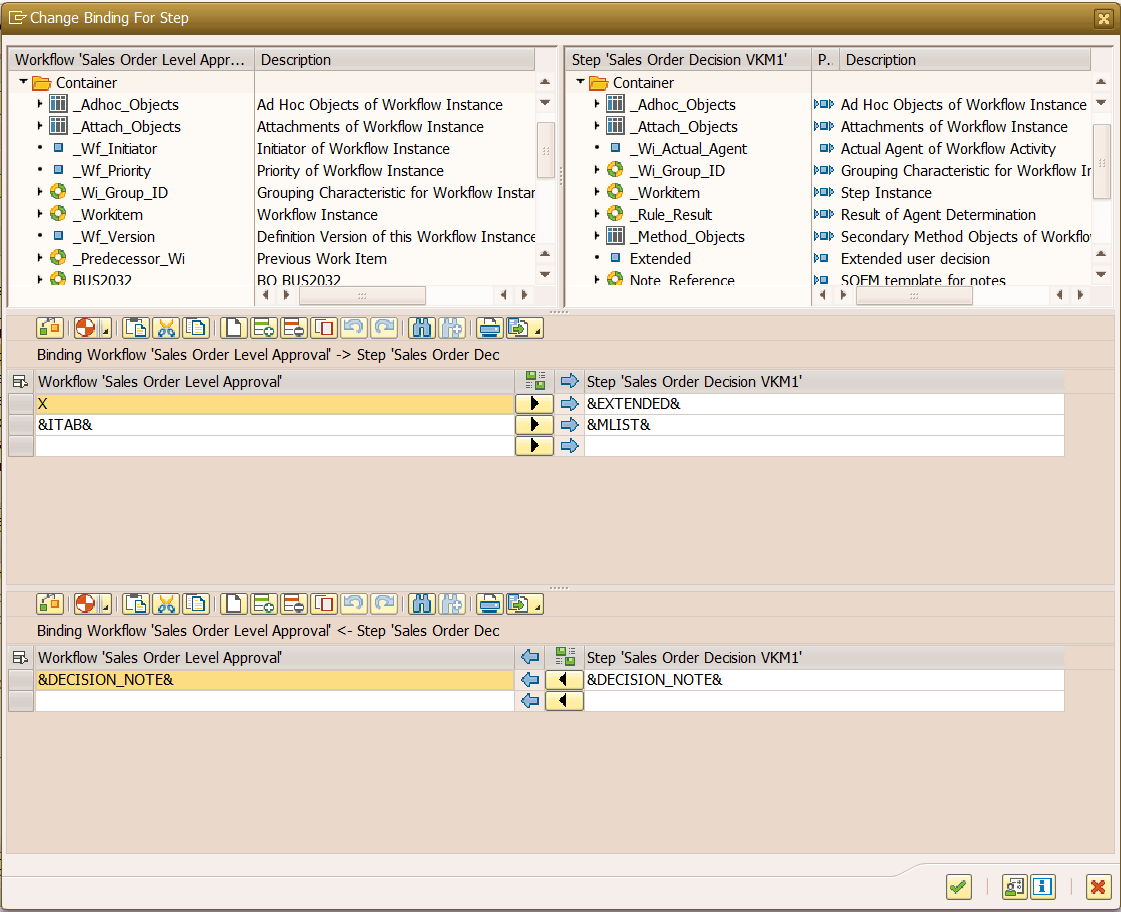
Binding is simple, pass &ITAB& to &MLIST& so HTML content can be displayed on Decision Body. Avoid Extended and Decision_note, I forgot to remove these auto-generated entries.
( Screenshot – 35 )
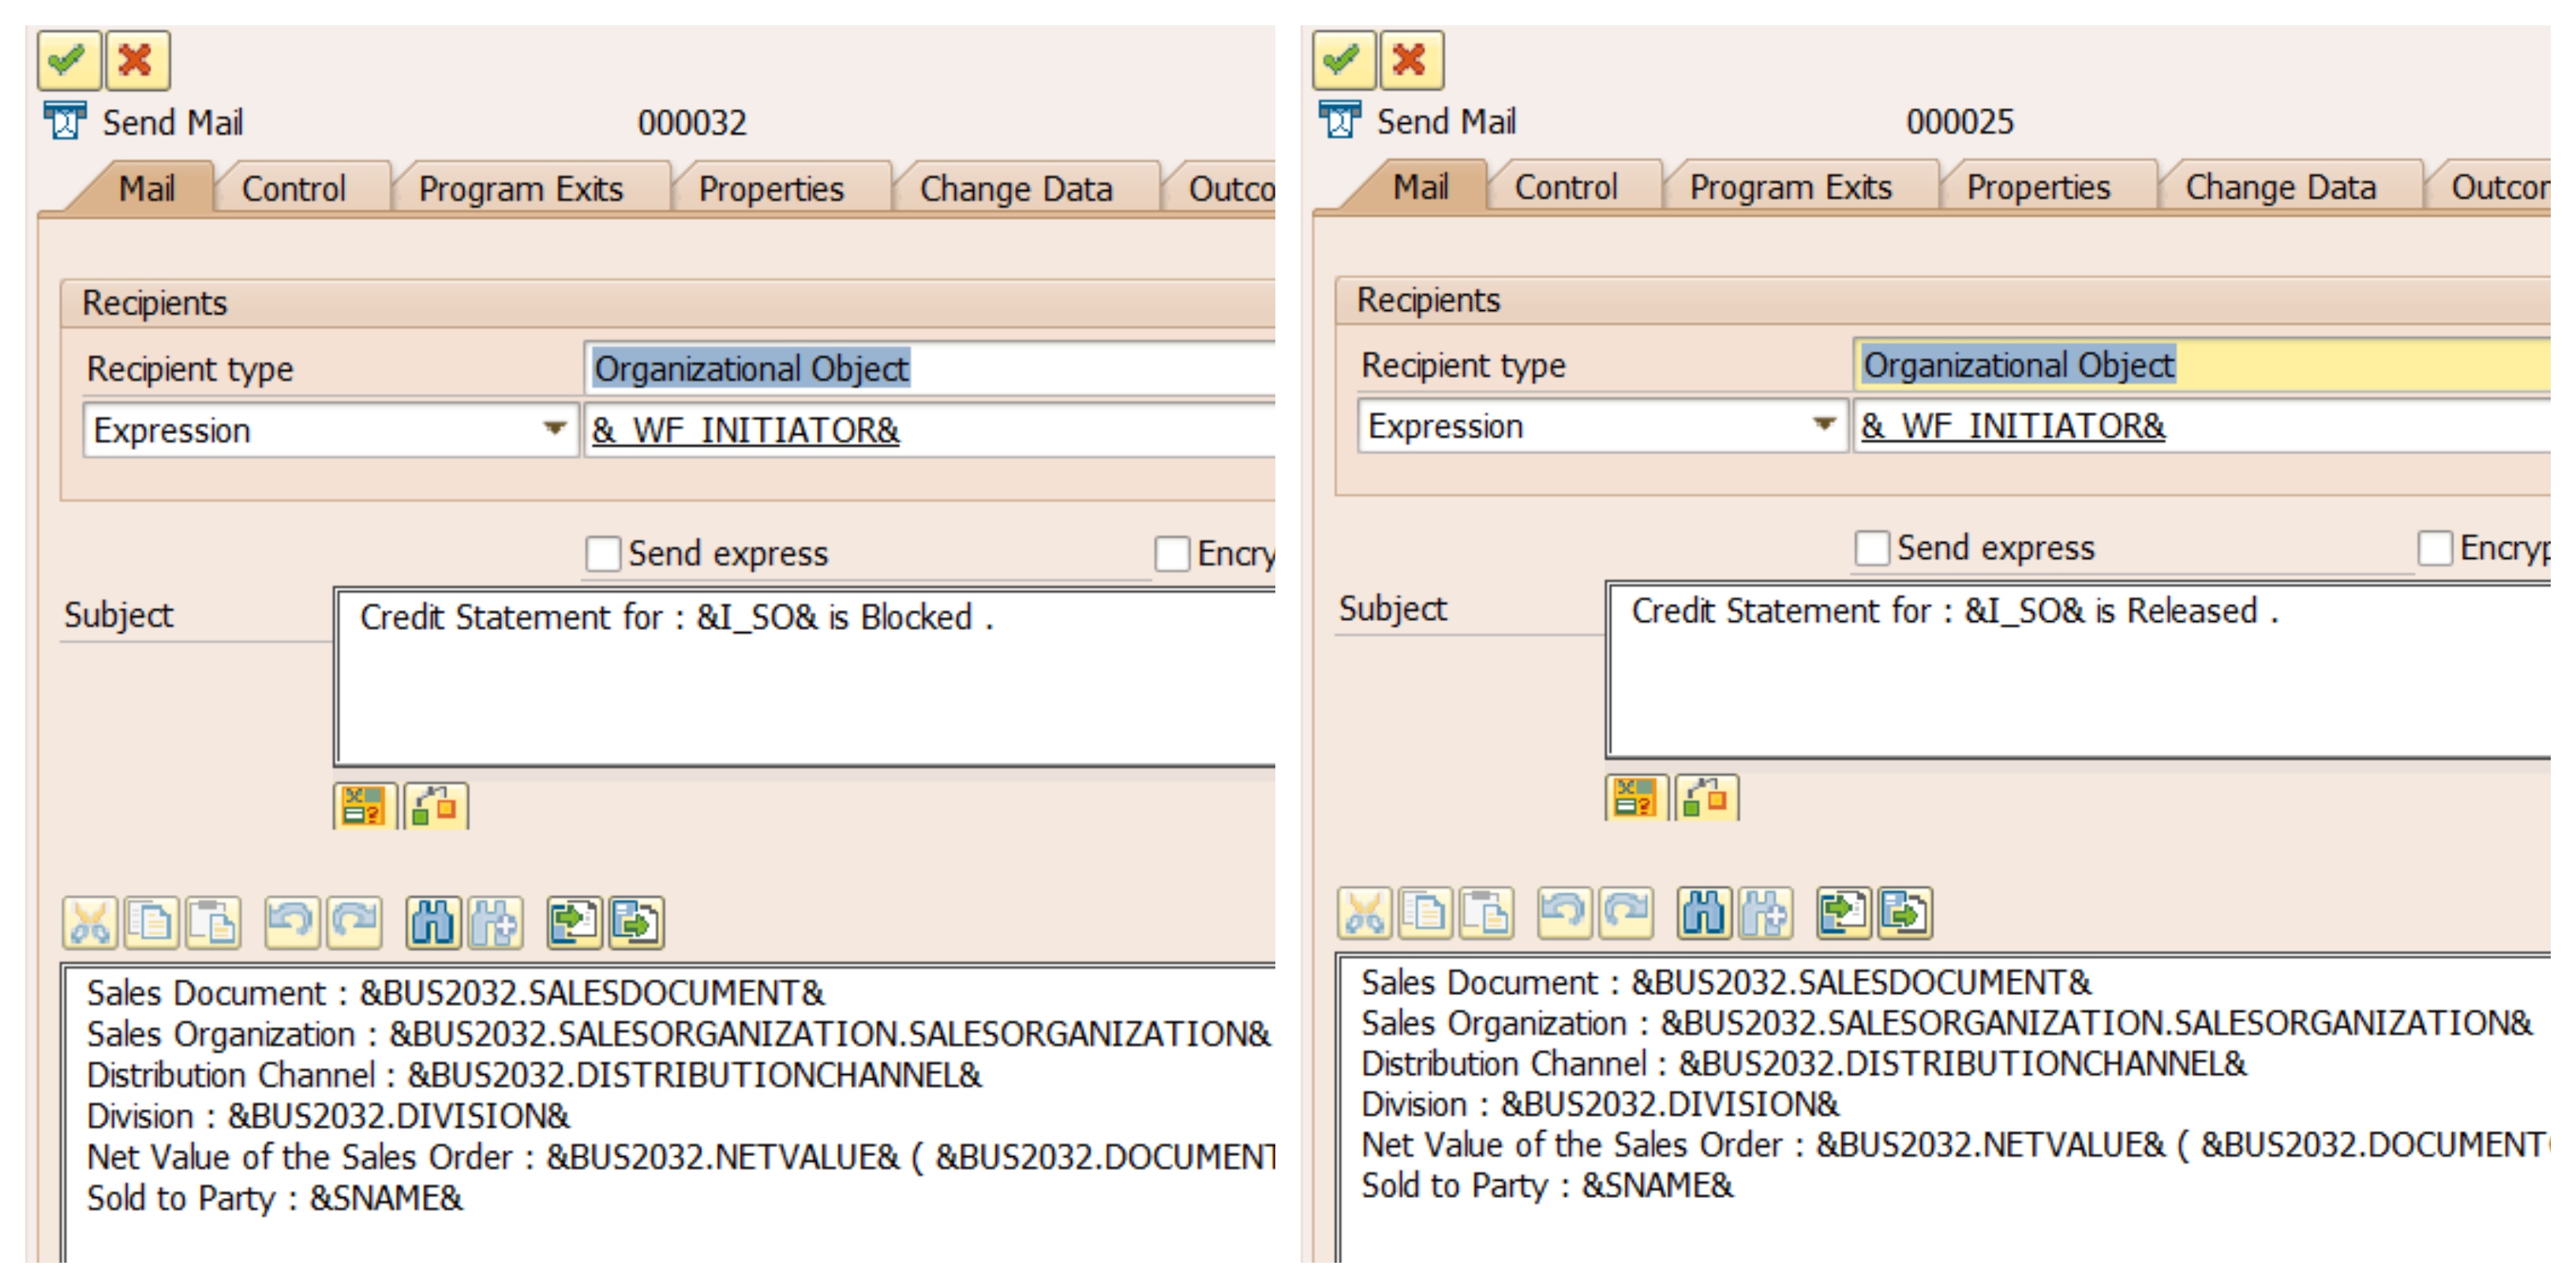
Step 8: Sales Order Credit Block Acknowledgement sent to the workflow initiator.
Create Send Mail step to send mail to the initiator. Here BUS2032 container element have enough data regarding particular Sales Order. So you can use it as bellow.
( Screenshot – 36 )
Reference Code.
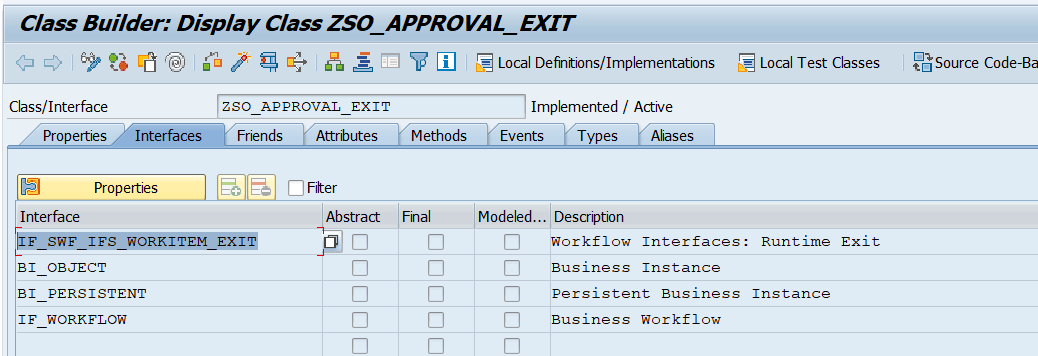
Class ZSO_APPROVAL_EXIT – Interfaces, following interfaces must be implemented.
( Screenshot – 37 )
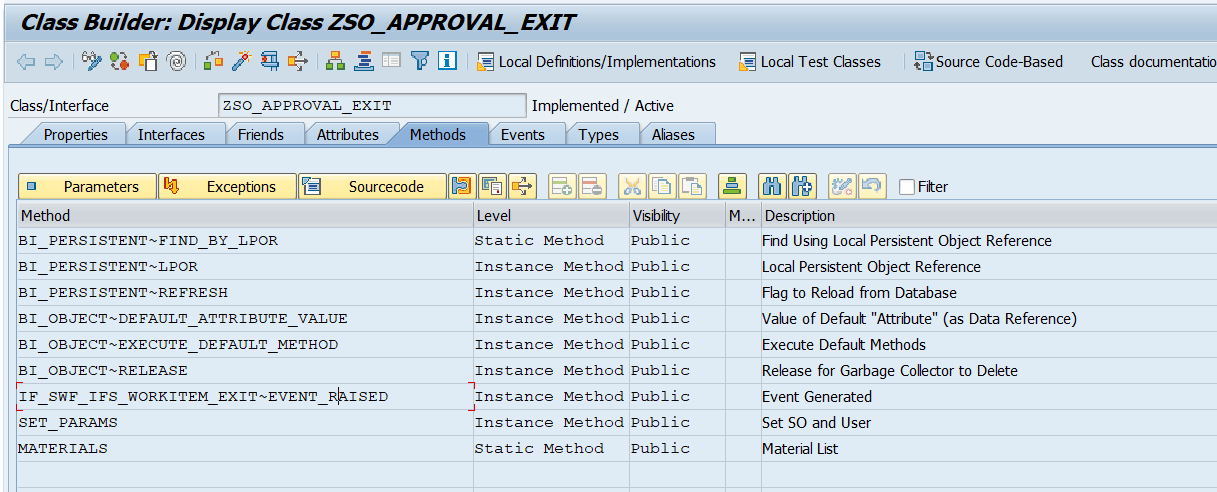
Class ZSO_APPROVAL_EXIT – Methods, there are only 3 methods used in this blog.
IF_SWF_IFS_WORKITEM_EXIT~EVENT_RAISED
This method is used to handle Decision Taken by the Approver.
SET_PARAMS
This method is used to trigger event when so is in Credit Block.
MATERIALS.
This method is used to get Sales Order details and List of materials.
( Screenshot – 38 )
Event_Raised – Method ( Code – 2 )
IF im_event_name EQ 'AFT_EXEC'.
      CHECK ls_wihead-wi_stat NE swfco_wi_status_error
      AND   ls_wihead-wi_stat NE swfco_wi_status_excpcaught
      AND   ls_wihead-wi_stat NE swfco_wi_status_excphandlr.

      l_wf_cont = im_workitem_context->get_wf_container( ).
      l_wi_cont = im_workitem_context->get_wi_container( ).

      CALL METHOD l_wf_cont->get
        EXPORTING
          name  = 'EVENT_NAME'
        IMPORTING
          value = _wf.

      CALL METHOD l_wi_cont->get
        EXPORTING
          name  = '_WI_RESULT'
        IMPORTING
          value = _res.

***IF A Persion has clicked on Approve button, _res = 0001. and _wf will be received from Workflow.
      IF _res EQ '0001' AND ( _wf EQ 'CREATED' OR _wf EQ 'CHANGED' ).

***Code to change SO status in JEST standard table.
***You can use 'I_CHANGE_STATUS' FM
***After getting approved by the approver, it will trigger workflow to next approver level as maitained in ZSO_APPROVAL Table.
***Manually Trigger workflow to next level approver.
***
***
                  WAIT UP TO 1 SECONDS.
                  CALL FUNCTION 'SAP_WAPI_CREATE_EVENT'
                    EXPORTING
                      object_type = object_type    "BUS2032
                      object_key  = object_key     "SALES ORDER NUMBER
                      event       = event.          "CHANGED


***
***
         ELSEIF _res EQ '0001' AND _wf EQ 'TRIGGER'.

              CALL METHOD l_wf_cont->get
                 EXPORTING
                     name  = 'ISO'
                 IMPORTING
                     value = so_n.


              CALL FUNCTION 'SD_ORDER_CREDIT_RELEASE'
                 EXPORTING
                   vbeln = so_n.

***
ENDIF.
Materials – Method – to generate HTML Content. ( Code – 3 )
*** ITAB and ISO are imporing parameters.
*** By using ISO that is SO Number you can get details of Materials
*** Append each HTML Line to ITAB [ ITAB TYPE ZSOLISTI1_TT ] Create TableType of SOLISTI1.
DATA : wa_contents TYPE solisti1.

    wa_contents-line = |<html><head><style>|.APPEND wa_contents TO itab.
    wa_contents-line = '.t1 {font-family: "Trebuchet MS", Arial, Helvetica, sans-serif;border-collapse: collapse;width: 80%;}'.APPEND wa_contents TO itab.
    wa_contents-line = '.t1 td, .t1 th {border: 1px solid #000;padding: 2px;}'.APPEND wa_contents TO itab.
    wa_contents-line = '.t2{font-family: "Trebuchet MS", Arial, Helvetica, sans-serif;border-collapse: collapse;width: 100%;}'.APPEND wa_contents TO itab.
    wa_contents-line = '.t2 td, .t2 th {border: 1px solid #504F4F;padding: 5px;}'.APPEND wa_contents TO itab.
    wa_contents-line = '.t2 tbody tr:nth-child(even){background-color: #f2f2f2;}'.APPEND wa_contents TO itab.
    wa_contents-line = '.t2 tbody tr:hover {background-color: #ddd;}'.APPEND wa_contents TO itab.
    wa_contents-line = '.t2h1 {padding-top: 12px;padding-bottom: 12px;text-align: left;background-color: #9BC2E6;color: #504F4F;}'.APPEND wa_contents TO itab.
    wa_contents-line = '.t2h2 {padding-top: 12px;padding-bottom: 12px;text-align: left;background-color: #A6A6A6;color: #504F4F;text-align:center;}'.APPEND wa_contents TO itab.
    wa_contents-line = |</style></head><body>|.APPEND wa_contents TO itab.
    wa_contents-line = |<table border="1" class="t1"><tbody>|.APPEND wa_contents TO itab.
    wa_contents-line = |<tr><td>Person Responsible</td><td>{ ename }</td></tr>|.APPEND wa_contents TO itab.
    wa_contents-line = |<tr><td>Sales Organization</td><td>{ wtab-vkorg }</td></tr>|.APPEND wa_contents TO itab.
    wa_contents-line = |<tr><td>Distribution Channel</td><td>{ wtab-vtweg }</td></tr>|.APPEND wa_contents TO itab.
    wa_contents-line = |<tr><td>Division</td><td>{ wtab-spart }</td></tr>|.APPEND wa_contents TO itab.
    wa_contents-line = |<tr><td>Sold to Party</td><td>{ wtab-name1 }</td></tr>|.APPEND wa_contents TO itab.
    wa_contents-line = |<tr><td>Inco-Terms</td><td>{ wtab-inco1 }</td></tr>|.APPEND wa_contents TO itab.
    wa_contents-line = |</tbody></table><table border="1" class="t2" style="margin-top:10px;"><tbody>|.APPEND wa_contents TO itab.
    wa_contents-line = |<tr><th class="t2h1">List of Material:</th></tr>|.APPEND wa_contents TO itab.
    wa_contents-line = |<tr><th class="t2h2">Material No</th><th class="t2h2">Material Description</th>|.APPEND wa_contents TO itab.
    wa_contents-line = |<th class="t2h2">Order Quantity</th>|.APPEND wa_contents TO itab.
    wa_contents-line = |<th class="t2h2">UOM</th>|.APPEND wa_contents TO itab.
    wa_contents-line = |<th class="t2h2">Pending Quantity</th>|.APPEND wa_contents TO itab.
    wa_contents-line = |<th class="t2h2">Basic Price</th>|.APPEND wa_contents TO itab.
    wa_contents-line = |<th class="t2h2">Amount</th>|.APPEND wa_contents TO itab.
    wa_contents-line = |<th class="t2h2">Currency</th></tr>|.APPEND wa_contents TO itab.

LOOP AT imat INTO wmat.

***GET MATERIALS DETAILS***

ENDLOOP.
wa_contents-line = |</tfoot></table></body></html>|.APPEND wa_contents TO itab.
SET_PARAMS – Method. ( Code – 4 )
 METHOD set_params.

    DATA: lv_objtype          TYPE sibftypeid,
          lv_event            TYPE sibfevent,
          lv_objkey           TYPE sibfinstid,
          lr_event_parameters TYPE REF TO if_swf_ifs_parameter_container,
          lv_param_name       TYPE swfdname,
          lv_id               TYPE char10.

    DATA : wa TYPE zmatlist.

    lv_objtype = 'ZSO_APPROVAL_EXIT'. " your class name
    lv_event   = 'TRIGGER'.  " event name.

    CALL METHOD cl_swf_evt_event=>get_event_container
      EXPORTING
        im_objcateg  = cl_swf_evt_event=>mc_objcateg_cl
        im_objtype   = lv_objtype
        im_event     = lv_event
      RECEIVING
        re_reference = lr_event_parameters.

    lv_param_name  = 'ISO'.  " parameter name of the event
    lv_id          = iso.

    TRY.
        CALL METHOD lr_event_parameters->set
          EXPORTING
            name  = lv_param_name
            value = lv_id.

      CATCH cx_swf_cnt_cont_access_denied .
      CATCH cx_swf_cnt_elem_access_denied .
      CATCH cx_swf_cnt_elem_not_found .
      CATCH cx_swf_cnt_elem_type_conflict .
      CATCH cx_swf_cnt_unit_type_conflict .
      CATCH cx_swf_cnt_elem_def_invalid .
      CATCH cx_swf_cnt_container .
    ENDTRY.

    lv_param_name  = 'IUSER'.  " parameter name of the event
    lv_id          = iuser.

    TRY.
        CALL METHOD lr_event_parameters->set
          EXPORTING
            name  = lv_param_name
            value = lv_id.

      CATCH cx_swf_cnt_cont_access_denied .
      CATCH cx_swf_cnt_elem_access_denied .
      CATCH cx_swf_cnt_elem_not_found .
      CATCH cx_swf_cnt_elem_type_conflict .
      CATCH cx_swf_cnt_unit_type_conflict .
      CATCH cx_swf_cnt_elem_def_invalid .
      CATCH cx_swf_cnt_container .
    ENDTRY.

    TRY.
        CALL METHOD cl_swf_evt_event=>raise
          EXPORTING
            im_objcateg        = cl_swf_evt_event=>mc_objcateg_cl
            im_objtype         = lv_objtype
            im_event           = lv_event
            im_objkey          = lv_objkey
            im_event_container = lr_event_parameters.
      CATCH cx_swf_evt_invalid_objtype .
      CATCH cx_swf_evt_invalid_event .
    ENDTRY.

    COMMIT WORK.
  ENDMETHOD.
Bellow code can be placed in MV45AFZZ user-exit or you can use BADI to call the SET_PARAM method to trigger the workflow.
( Code – 5 )
*** TRIGGER WORKFLOW FROM MV45AFZZ.
*** LV_USER is an Approver who is going to take decision whether SO should be removed from Credit Block or Not.

*** MANUALLY TRIGGER WORKFLOW FOR VKM1
 DATA obj TYPE REF TO zso_approval_exit.
      data lv_user_t type uname.

  CREATE OBJECT obj.
      lv_user_t = |US{ lv_user }|.
      obj->set_params( EXPORTING iso = vbak-vbeln iuser = lv_user_t ).
*** MANUALLY TRIGGER WORKFLOW FOR VKM1


*** CODE TO REMOVE OLD/PENDING WORKFLOW TRIGGERD FOR THE SAME SO.
      lv_srch = |%{ lv_vbeln }|.       "CONCATE % WITH SO NUMBER

      SELECT wi_id wi_aagent wi_cd wi_ct FROM swwwihead INTO TABLE wtab
          WHERE wi_text LIKE lv_srch AND
          ( wi_stat EQ 'READY' OR wi_stat EQ 'STARTED' OR wi_stat EQ 'SELECTED' ) AND
          top_task EQ 'WS90000016'.

       LOOP AT wtab.
          IF wtab-wi_cd LT sy-datum.
            CALL FUNCTION 'SAP_WAPI_ADM_WORKFLOW_CANCEL'
              EXPORTING
                workitem_id  = wtab-wi_id
                actual_agent = wtab-wi_aagent.
          ELSEIF wtab-wi_cd EQ sy-datum AND wtab-wi_ct LE time.
            CALL FUNCTION 'SAP_WAPI_ADM_WORKFLOW_CANCEL'
              EXPORTING
                workitem_id  = wtab-wi_id
                actual_agent = wtab-wi_aagent.
          ENDIF.

        ENDLOOP.
What did you learn from this blog post?
You can create a workflow with standard BO events and custom class event by following this prototype. It is also possible to merge multiple workitem in a single workflow .
Dynamic agent assignment using Function Module.
You can design your own stylish content in mail body using CSS + HTML.
Further, you can also add validation in Outbound Delivery and Invoice as well to restrict it without final level approvel.
( Screenshot – 39 )
Do connect me if there is any issue or if I missed some points.
We use cookies to ensure that we give you the best experience on our website. If you continue to use this site we will assume that you are happy with it.